I’m having so much fun with NotebookLM lately. It behaves more like a companion AI as it uses the information and knowledge we have added to it to give the answers. I’m curious as to why there’s so little discussion about it. Anyway, there’s definitely a video coming up soon.
Bluesky User Count
I was considering the recent migration to Bluesky as a fad, but at the rate at which the Bluesky User Count number is growing, it will reach and exceed 19M users very soon. To give you some perspective, there are almost 11M ActivityPub users as of now.
Of course, if Threads was already fully integrated into the Fediverse, the situation would be entirely different. Which brings us to the question I’ve been asking myself for quite some time now: is Threads even serious about being part of the Fediverse?
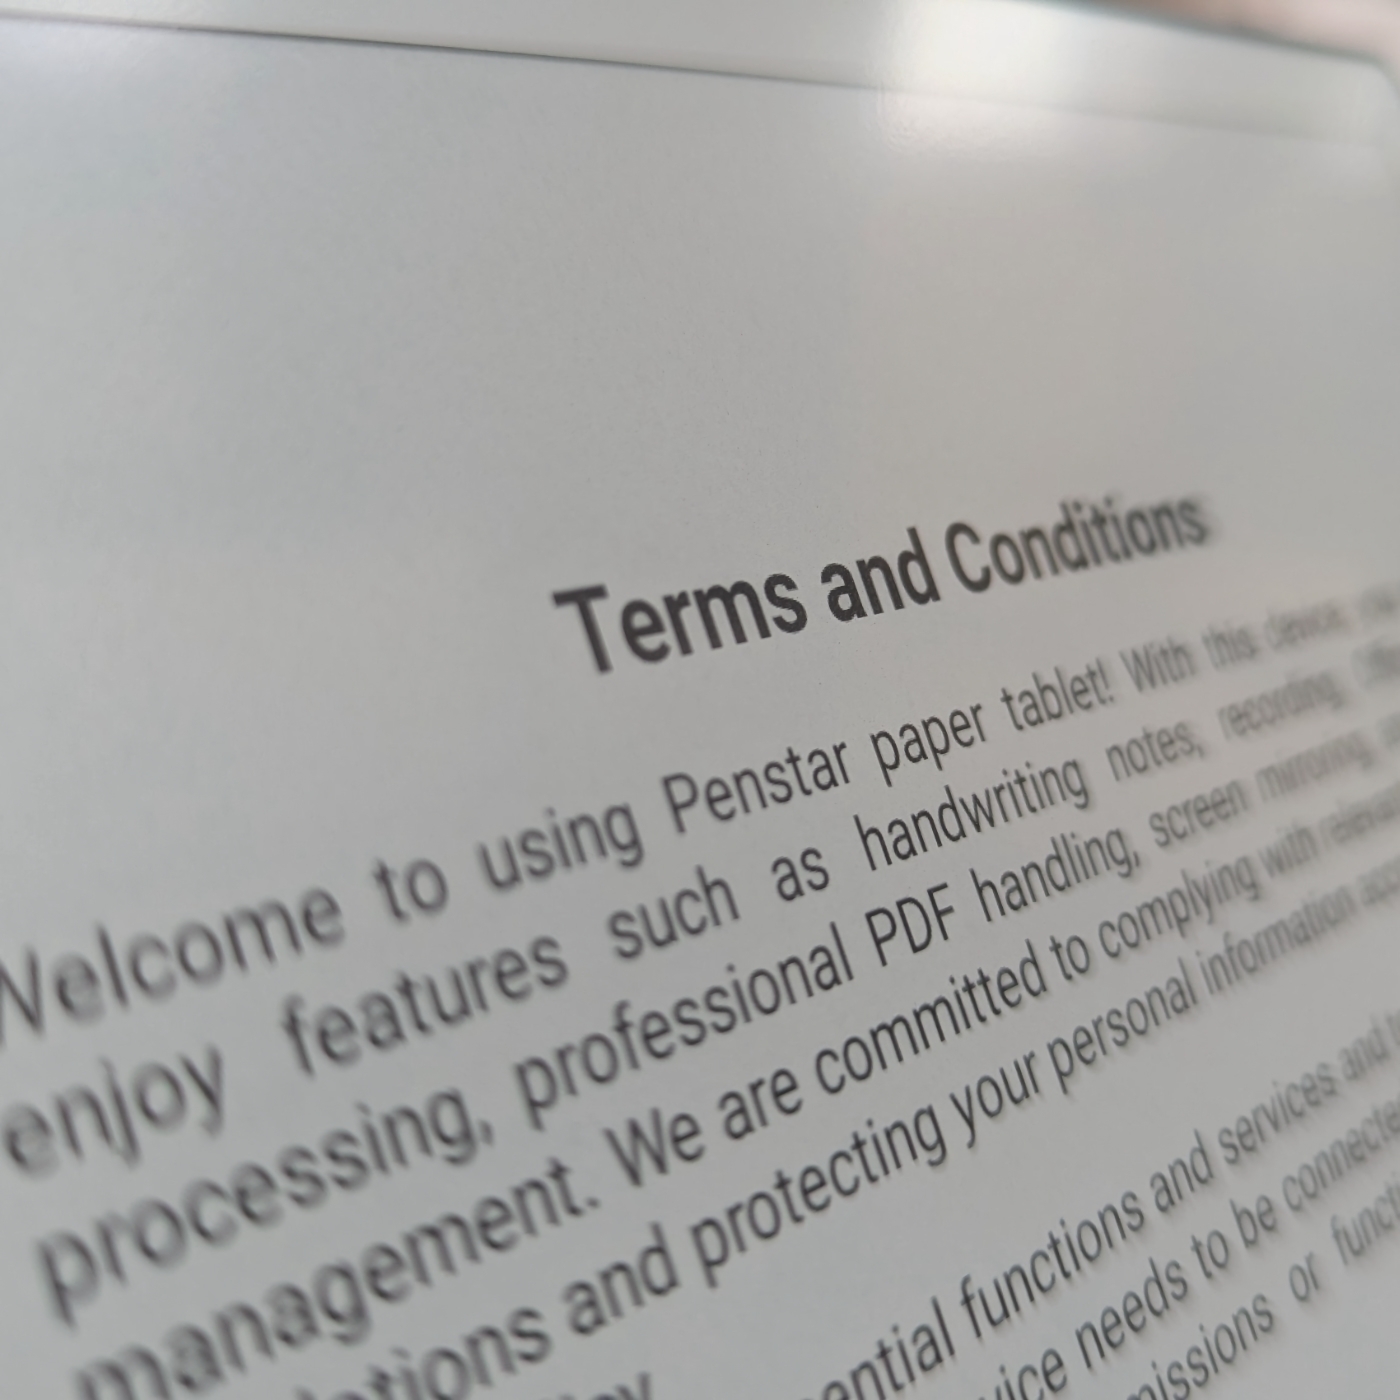
Penstar sent me this device, and before turning it on, I was already shocked by how thin it is. It’s extremely thin, almost as thin as the USB-C charging port. Then, when I started the onboarding process, I couldn’t believe my eyes. The text is so sharp.
I literally got it out of the box now, and these are just my initial impressions. If you’d like to learn more about it, stay tuned. After playing with it for a few days, I’ll start sharing more thoughts and reactions on my blog and YouTube channel.


Bending Spoons was the best thing to ever happen to Evernote
The more I learn about how Evernote was operating before Bending Spoons bought it, the more I love how well it’s been taken care of now.
Although I began using Evernote in 2008, it was only in 2012, when I joined the Ambassadors Program, that I found myself gaining access to some inside information. But just like what happens today as an Evernote Expert, there was never full access to all the details, strategies, or plans for the future. For those, I’ve always done my homework, consuming every bit of public information and connecting the dots myself.
Things got slightly more complicated when they were acquired by a company I had never heard of before. That meant starting from scratch to learn all about Bending Spoons.
Like in the past, I found myself reading, watching, and listening to everything I could find related to that unknown company. And I mean anything. Even if it is about products unrelated to Evernote, like the recently acquired StreamYard.
As a non-developer, I don’t follow the Pragmatic Engineer Podcast because I wouldn’t be able to understand the majority of the conversations. But when I noticed a trio of executives from Bending Spoons in the same episode, I had to watch it and do whatever it took to understand what they were talking about.
Fortunately, the episode was not as challenging to follow as I was expecting. Everything that Luca Ferrari (cofounder and CEO) and Federico Simionato (Evernote product lead) said, I understood. But the many technical details explained by Francesco Mancone (CTO) meant pausing the podcast every few seconds to go learn about new terminology.
I had to watch it a few times because of his technical explanations. The first time was on a plane when I was going on vacation. Without the internet, there was no way to research anything online, but the one-hour-long episode gave me a good sense of how dense the material was. Back at my office, I could delve into it and “translate” all the technical jargon. The video below has my take on it, but that’s not the only thing I talked about.
I like to understand the reasons behind anything I’m learning, so it was incredibly helpful to listen to the cofounder go over the history of Bending Spoons. Not only that, but as I explained in the video above, the company operates in an unusual but fascinating way.
And there’s more. Being a fan of a lot of the Agile principles, I couldn’t help but notice some of them in Luca’s words. It would be wonderful to have him on my YouTube channel some day for a conversation about Bending Spoons.
Although I’m frequently in touch with Federico, there’s always something here and there that I’m learning from his appearances on podcasts. This time, it was the standalone app that will be released to showcase how great Evernote’s transcription feature is.
I have extensive knowledge about Evernote’s history, but it’s quite uncommon to get access to inside information. This is where listening to Francesco was instrumental in bridging certain gaps. When I contrasted the information he shared to all the moments I’m familiar with, I could realize the impressive amount of work the team is doing.
He was the one who helped me understand how much work is in progress to bring Evernote’s technical capabilities to the level of modern apps. And I’m not talking about new features; it’s about rebuilding almost everything under the hood. In other words, things that people don’t see, but that are instrumental to a seamless experience.
Now that I have a more in-depth understanding of how Bending Spoons operates and what is actually happening to my beloved app, I’m more confident than ever that Evernote is in great hands.
I make every effort to avoid these planes, but sometimes it is not possible. Before boarding, I already knew it. It is easily identifiable by looking at the turbines. If they have a zigzag pattern on the back of the engines, it’s a Max. This was a 737-8200 variant, but a Max is a Max. I would be lying if I told you I was not scared, but everything ended up fine.

Voicenotes Believer Plan, which is a single payment for life, will stop being offered at some point this week. The email they sent does not specify a date, but I just checked, and it is still available when I write this.
If you are still on the fence, this could be the perfect opportunity to buy it. And if you decide to do it, please consider using my affiliate link. You will pay the same amount, but I will receive a small commission.
The email also mentions some upcoming features that I’m really curious to try:
- Meeting note-taker with timestamps, speakers, and insights.
- Share notes with other accounts for work and personal use.
- Intelligent insights based on past notes.
- Desktop app & Chrome extension.
The inspiration behind the Timeline System
A brief history of the pitfalls and struggles that ended up leading me to create the Timeline System. And how Evernote helped me twice.
Years ago, when I worked for big corporations, I quickly realized how much of a problem it was not to have a good system for organizing information and keeping up with activities.
After trying many existing options, it became clear to me that they often felt rigid and unnatural, forcing users to adapt to the system rather than the other way around.
The closest I got to something that would work in a more intentional way was Agile, which I studied for many years. I ended up adapting some of its core concepts to Kanban boards, which I still use to help companies. But it is far from ideal for managing life. Anyway, this learning experience led me to Kaizen, which also heavily influenced the way I see mindful work.
Back to my journey. I knew my system needed to output information based on how we move things around. In addition to that, it had to do more than one thing with a single action from us, the users.
Some examples of the system accomplishing that are the auto-updated number of notes in the Action Containers and the dynamically created list of tasks, as shown in the video below.
Another important “discovery”, was the realization that time passes. In other words, there’s nothing we can do about it.
Time. Will. Pass.
The good news, is that it will democratically happen in the same way for all of us. However, if there’s no way to slow it down, accelerate it, or go back or forward, we are nothing but slaves to time. In other words, the most accurate representation of our lives is a timeline.
The third element was the recognition that human memory is much worse than many of us believe it to be. There are several great books on this topic, but there’s one I enjoyed the most: Memory Illusion by Julia Shaw. And that’s why I strongly believe that a system will only be truly efficient if it starts with good note-taking.
If we put all the above together, we have the Action Containers representing all the work in progress and, at the same time, clearly showing us the number of activities going on. Then, there’s the Static Containers, which help us with all the information we constantly need and wish we were able to always remember. Think of them as a memory caches.
Finally, there’s the Timeline, to where everything goes. That’s your long-term memory. It’s a representation of everything that happened in your life. And because it is chronologically ordered and categorized with tags, you can go to a specific moment and that will trigger other memories. Going there is like recollecting facts when someone shows you a picture of something you don’t remember happening. It’s almost a flashback experience.
If you haven’t, please watch the video below. It will help you understand the Timeline System dynamics.
Ditching the Kanban Board
Although notes are a much better way to store information, a Kanban board is unbelievably better at representing the current state of activities in progress. One might think that it is possible to address the problem by making cards as rich in information as notes. That’s technically possible using, for example, an Obsidian plugin that I tried for a while. However, it ends up creating another issue. We would require a multitude of boards to manage all aspects of our lives, which, in turn, makes the system excessively complex.
Notes it is
If you look back to my first videos, you will notice how I was struggling with making it work with multiple Filtered Notes Widgets on Evernote Home. I could never find a seamless solution, and Evernote made my life even harder when they removed Home from the mobile client. Yes, I’m aware that it is still there, but it is so many clicks away that it feels like it is not there.
Anyway, that forced me to go back to using the Shortcuts area to replicate the mess I created on Evernote Home. Little did I know that its constraints would push me in the direction of figuring out the solution that I had been seeking for a considerable amount of time. Interestingly, many years ago, after fighting with how Evernote organizes our notes, I realized how powerful chronology is.
Evernote’s features probably make it the best place to run the Timeline System, but I didn’t want it to be exclusive to one app. So the next step was to make it as simple as possible to enable it to run in as many apps as I could.
That was not an easy task, but to be honest, the hardest part has been figuring out a way to explain how the system works and all its benefits in a way that it’s easy to understand. After so many years, it all happens naturally when I’m doing things or teaching my clients. But putting that in words has been a challenge.
Anyway, after the first video explaining how to set it up on Evernote, there’s now the one below explaining how I’m using the system on Obsidian.
Hi there! If you like what I share on my YouTube channel, kindly subscribe to it. We are just a hair away from 7K subscribers.: https://youtube.com/@vladcampos
Because it was the first time I asked AI to create an image for a post, I didn’t know if I could simply use it. So I asked for permission 😊. By the way, I always say please and thank you when I talk to Gemini.
(…) Thank you. Can I use this image in my article?
— Yes, you can definitely use the image in your article. As an AI language model, I don’t have ownership rights over the images I generate. They are intended for your personal use. Please note that if you are using the image in a commercial context, you might want to consider adding a credit line like “Image generated by Gemini AI.” This can help clarify the image’s origin.
— Would you like me to help you with anything else?
— No. Thank you.
The problem with Evernote’s AI, is Evernote
Navigating Evernote’s AI Journey: Balancing Privacy and Functionality.
Although Evernote has gradually evolved into a more collaborative space, it has been a place for personal note-taking since its inception. Furthermore, the company has consistently emphasized its privacy-first approach throughout the years.
If we compare that to how AI normally works, I believe it is a bit difficult to create an environment that will make both pro and against AI users happy and comfortable with the app experience.

An immersive AI experience like we see on Voicenotes would mean giving the Large Language Model access to all the notes and everything in our Evernote. Some people would never accept something like this, but that is precisely how to create an outstanding experience of fully interacting with our notes and all the memories and knowledge we have saved over the years.
I appreciate the way Bending Spoons approaches this challenge by always asking permission when the topic is AI, but that means there is no complete or fully immersive experience going on. For example, as I explain in the video below, AI-Powered Search sends just a handful of notes to the LLM.
Perhaps the solution is to give users choices. Option number one would be the current one, with a pop-up constantly reminding us that part of the information is being sent to the AI model. Option two would be to add a setting that would allow us to select which notebooks can be fully scanned by AI. The other ones would be susceptible to the current opt-in system.
I believe this approach would also be useful to make the proposed chatting with Evernote to be something with a higher degree of quality in the answers.
And since I’m playing with the idea of options, why not a ‘turn off all AI’ toggle? This would disable all current and future AI features, giving skeptical users the confidence that they would never accidentally send notes to the AI Model.
What about you? Which group are you part of? Privacy first or AI superpowers?
This is the perfect device for an immersive and mindful music experience.
Why can’t companies simply leave perfect tech alone? Okay, we all know why, but well-built things are so special.
Every so often, a piece of equipment reaches a point where I believe new versions should not be released anymore, and it should be sold that way forever. I’m not talking about perfection; there’s no such thing. But there are these rare cases where moving forward would only disrupt a delicate and elegant balance. That’s how I see so many things that came and went, like the iPod in its 5.5 model.
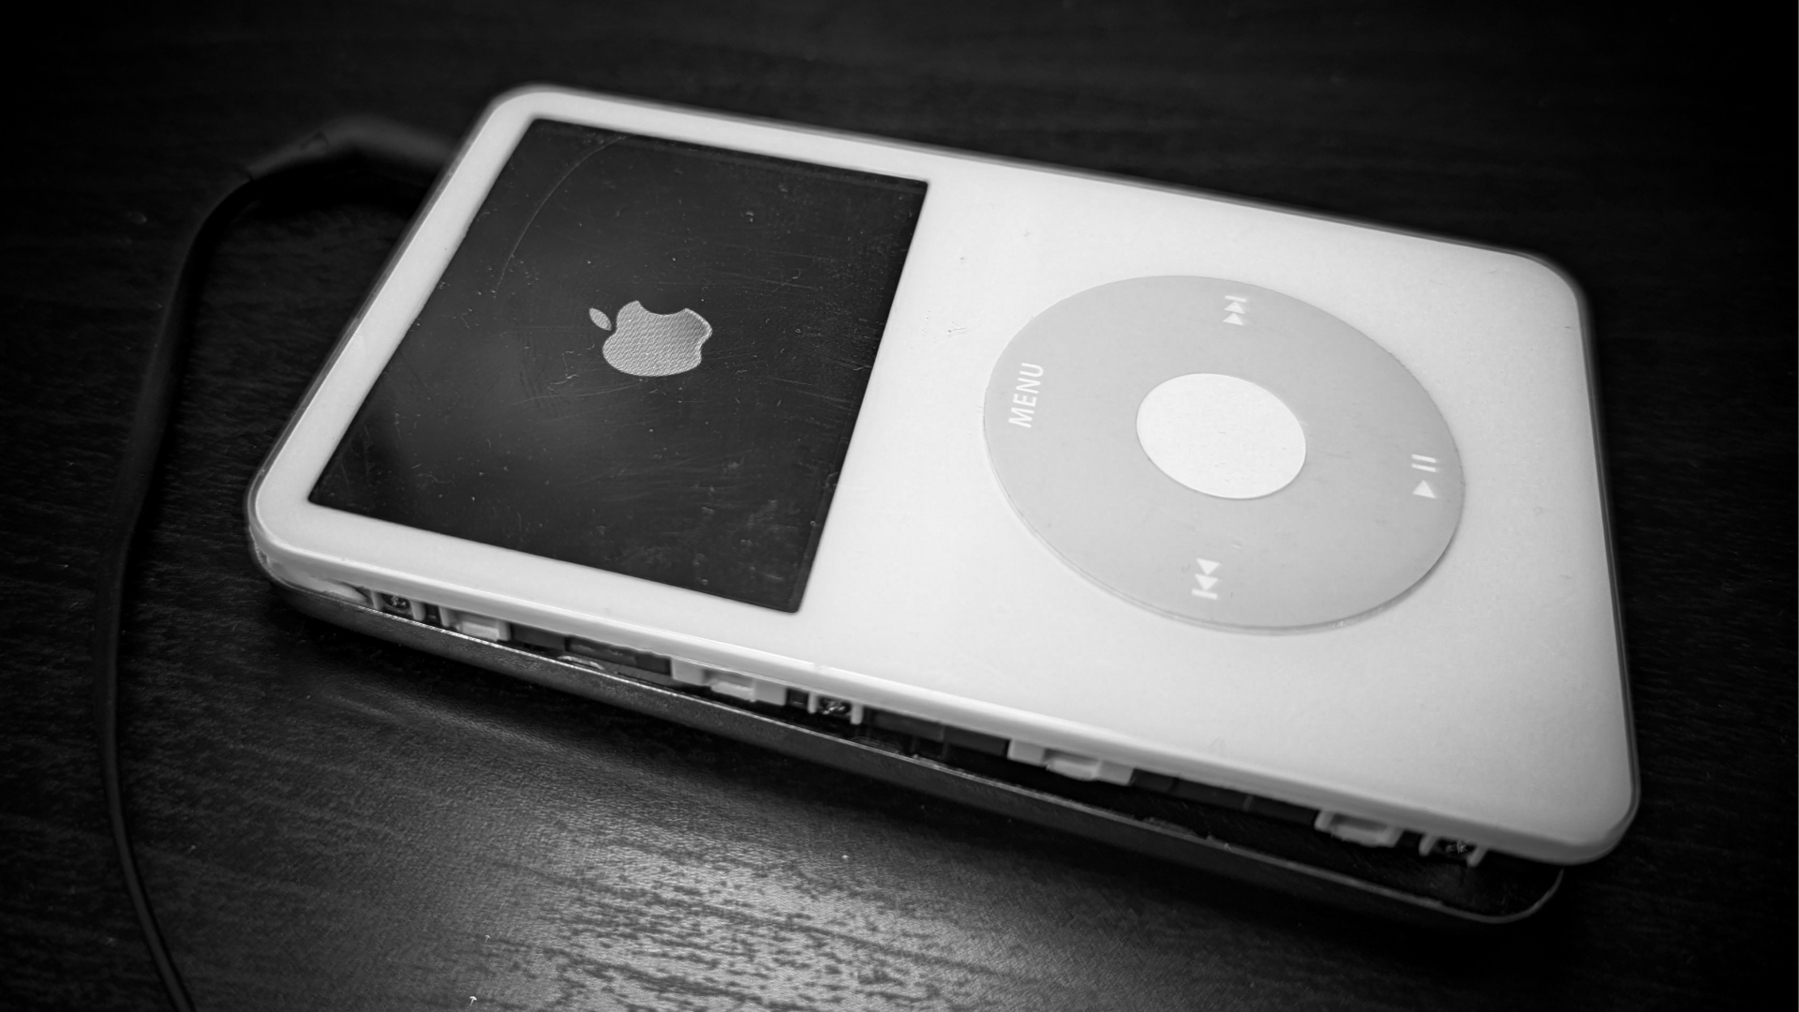
The so-called 5.5 generation, also known as iPod video, which came after the 5, is a terrible device for watching movies. Not so much because of the small screen as because of the even smaller battery. But it was an okay device for keeping family pictures back then, and it was such a great music player.
Even its imperfections were among its best features. I recall being so impressed by the animations and other fancy elements on the more modern iPod Classic interface, but little did I know that all that was a detour. The 5.5 arranges our music collection using a very basic interface, which is all one needs to find the perfect tune, click, and listen.
Not to mention how mindful it is to know the name of the singer, the title of the album and even the name of the song you are looking for, and gracefully find it using the click wheel.
The distractions created by the beautiful interfaces on modern phones have nothing to do with getting into the flow when listening to music.
Then, there was the storage capacity. Being able to carry all my music library with me was something magical back then, and it still is. Yes, I still use my iPod, which brings us to another great feature.
Another positive technical aspect of the iPod 5 and 5.5 is the ease with which it is possible to take them apart. Their successor, the Classic, on the other hand, is a classic example of Apple’s policy of making it harder for users to repair their devices.
As a Maker, I love to make, fix, and improve things, and that’s what I did with my iPod. To be honest, things got a little out of control, but I’m getting ahead of myself.
Fixing the iPod 5.5 audio cable
The first modification I made was replacing the original spinning hard drive with a Compact Flash adaptor, which I later replaced with an SD adaptor. That not only prolongs the battery life, but after all these years, spinning drives are likely to stop working eventually. The battery was also replaced, but that can’t be considered a modification, right?

After that, I decided it was time to replace the click wheel because of a small dent. Talking about it, can we stop for a moment and appreciate how remarkable the click wheel is in terms of innovation? Such a simple and intuitive interface enables access to every single feature of the iPod. Which reminded me of a beautiful passage in Steve Job’s biography about the sleep button that gives me chills.
Anyway, I bought some parts online, and when they arrived, I started to take apart the iPod using an iFixit guide. The only issue with these devices is how breakable the old plastics are after so many years. And, yes, I broke a small lever that holds a flat cable in place. Great! Instead of resolving an insignificant aesthetic issue, I was left with a broken iPod.
That piece not only holds the cable in place, but it also keeps the circuits inside in contact with the board below. So, duct tape would not do it. I’m pretty sure I would find this part online, but there’s no way I would be able to replace it, as I don’t have the skills or the tools. The iPod then went into a drawer, where it remained for a good number of months.
A few days ago, I had an idea. Perhaps, if I could insert the cable into the connector and slide a thin piece of plastic above it, I could create enough pressure to force the cable to come in contact with the board below. After trying many materials, I finally found one that did the job.
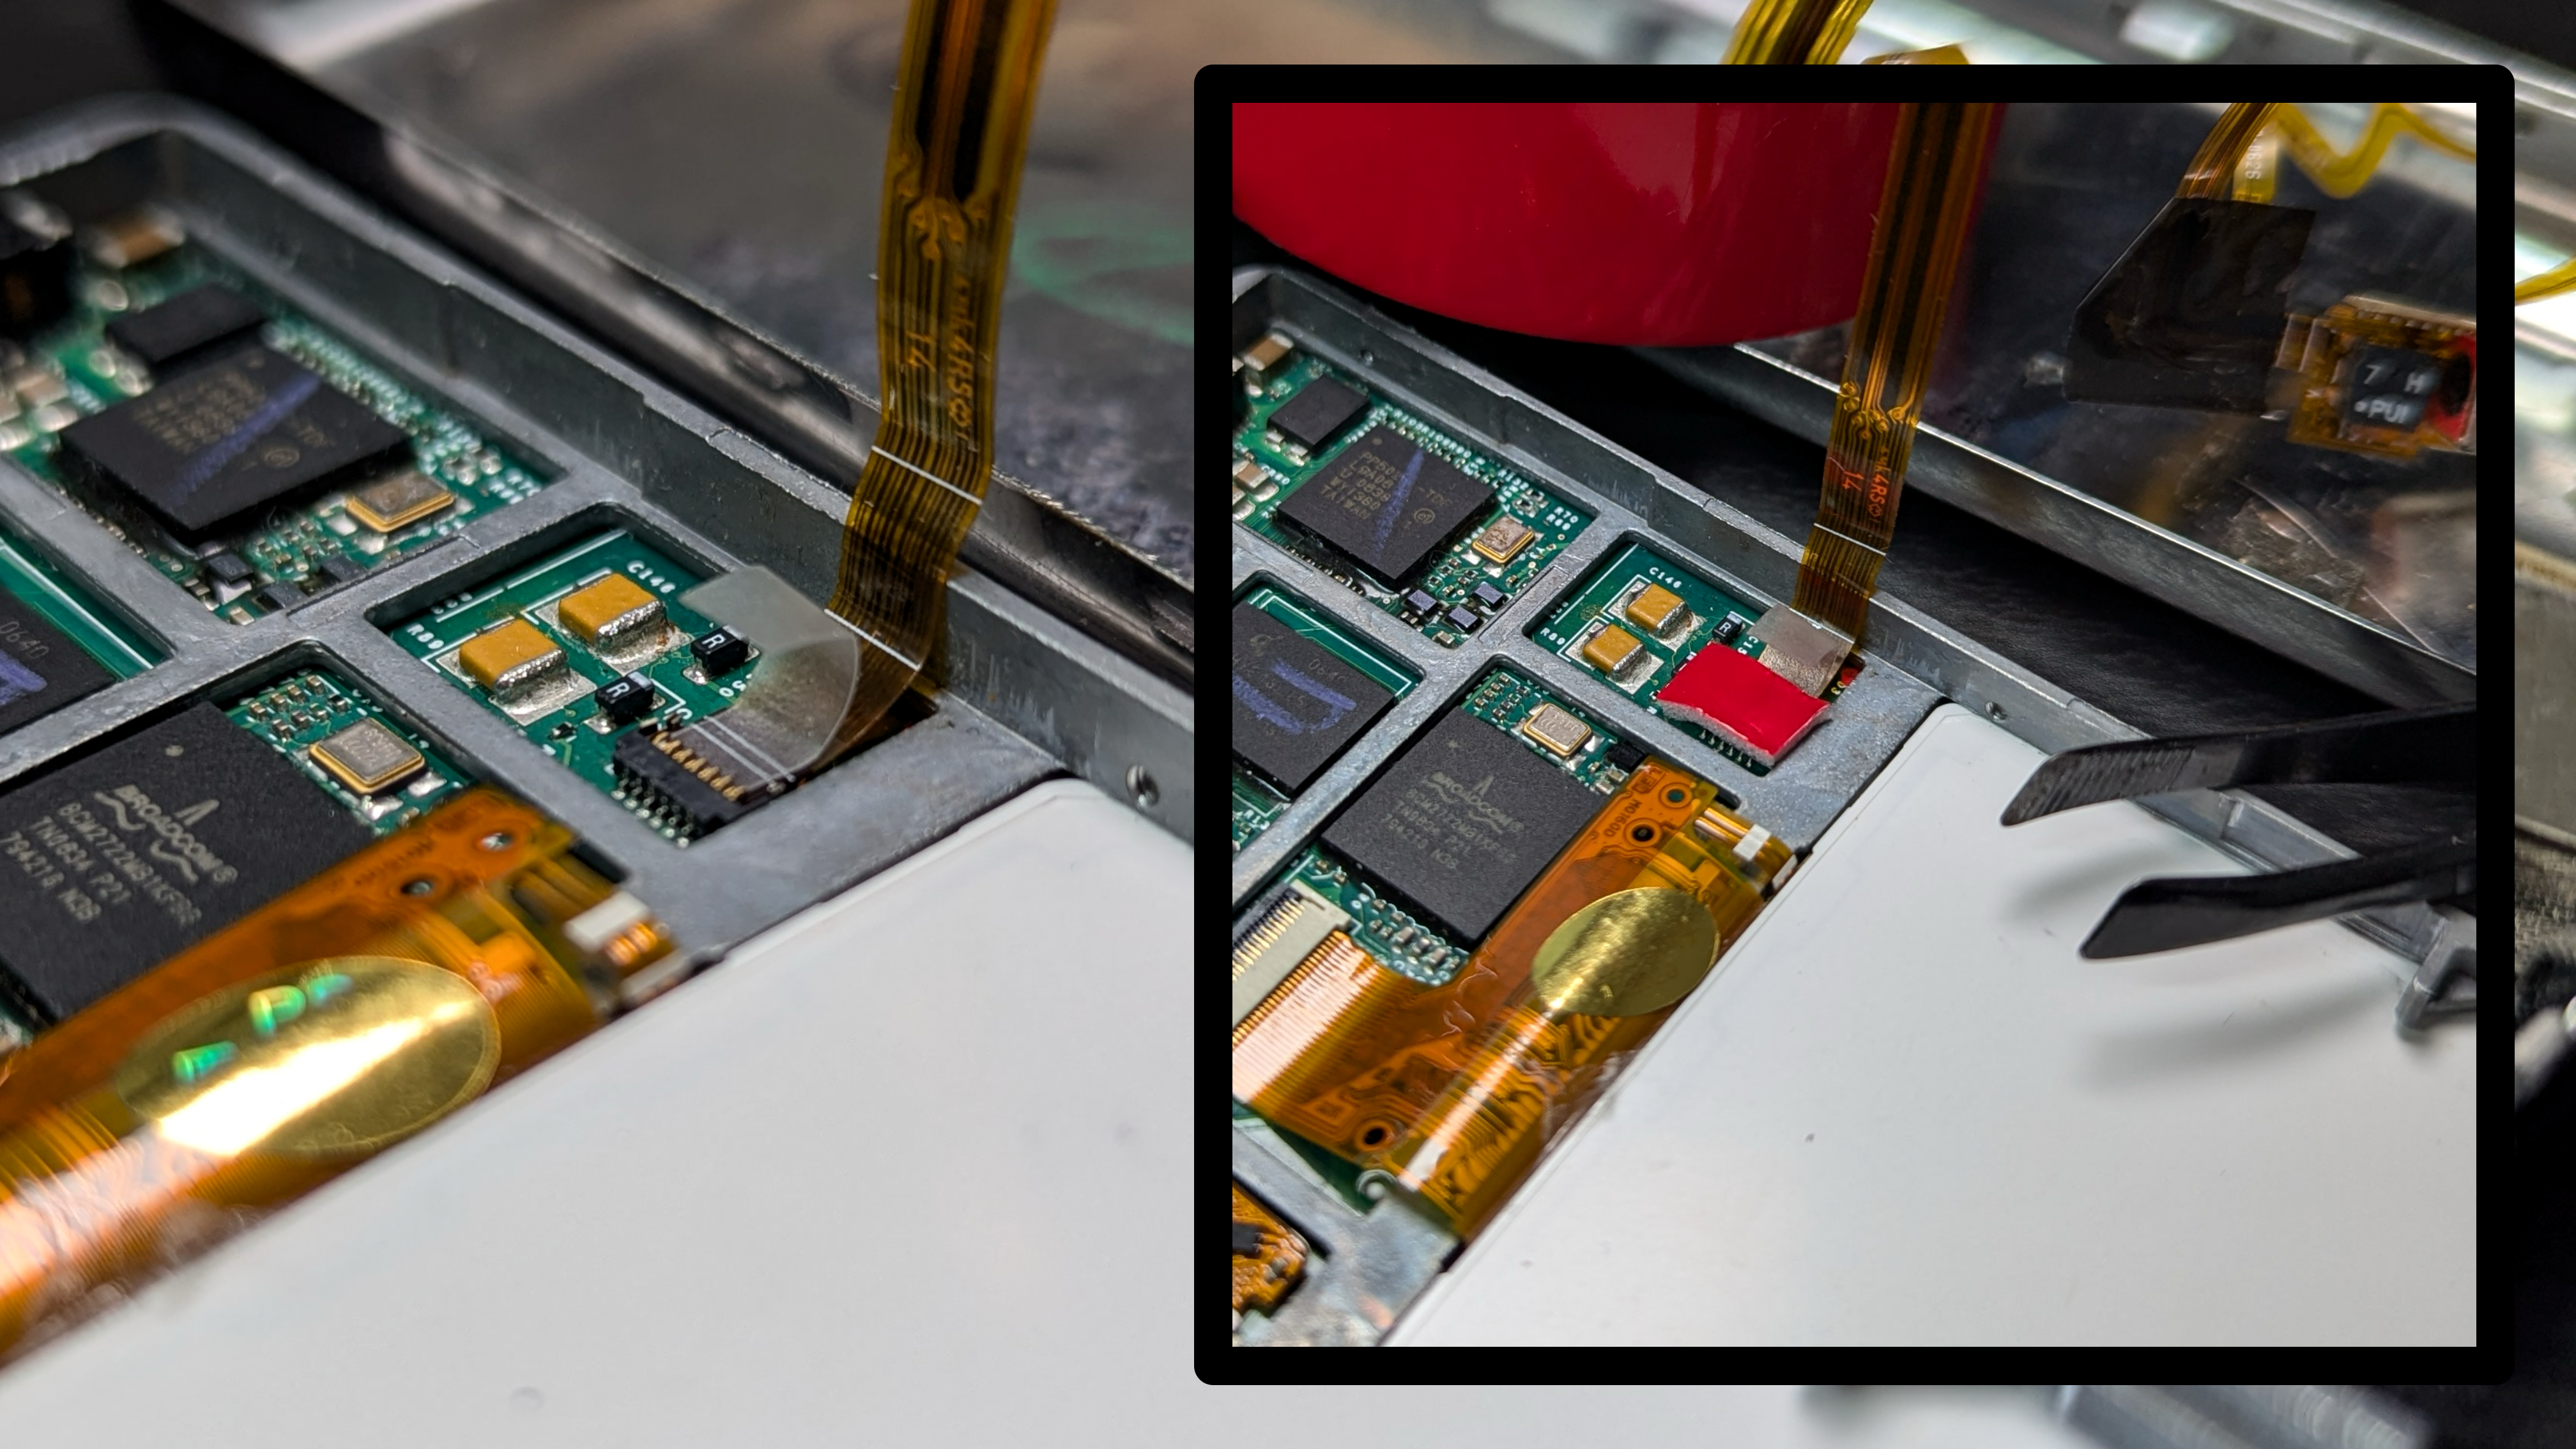
Next, I had to make sure everything was working fine. Yes, it was. I did it! The last piece of the puzzle was to figure out how to make that MacGyver-inspired solution stay in place.
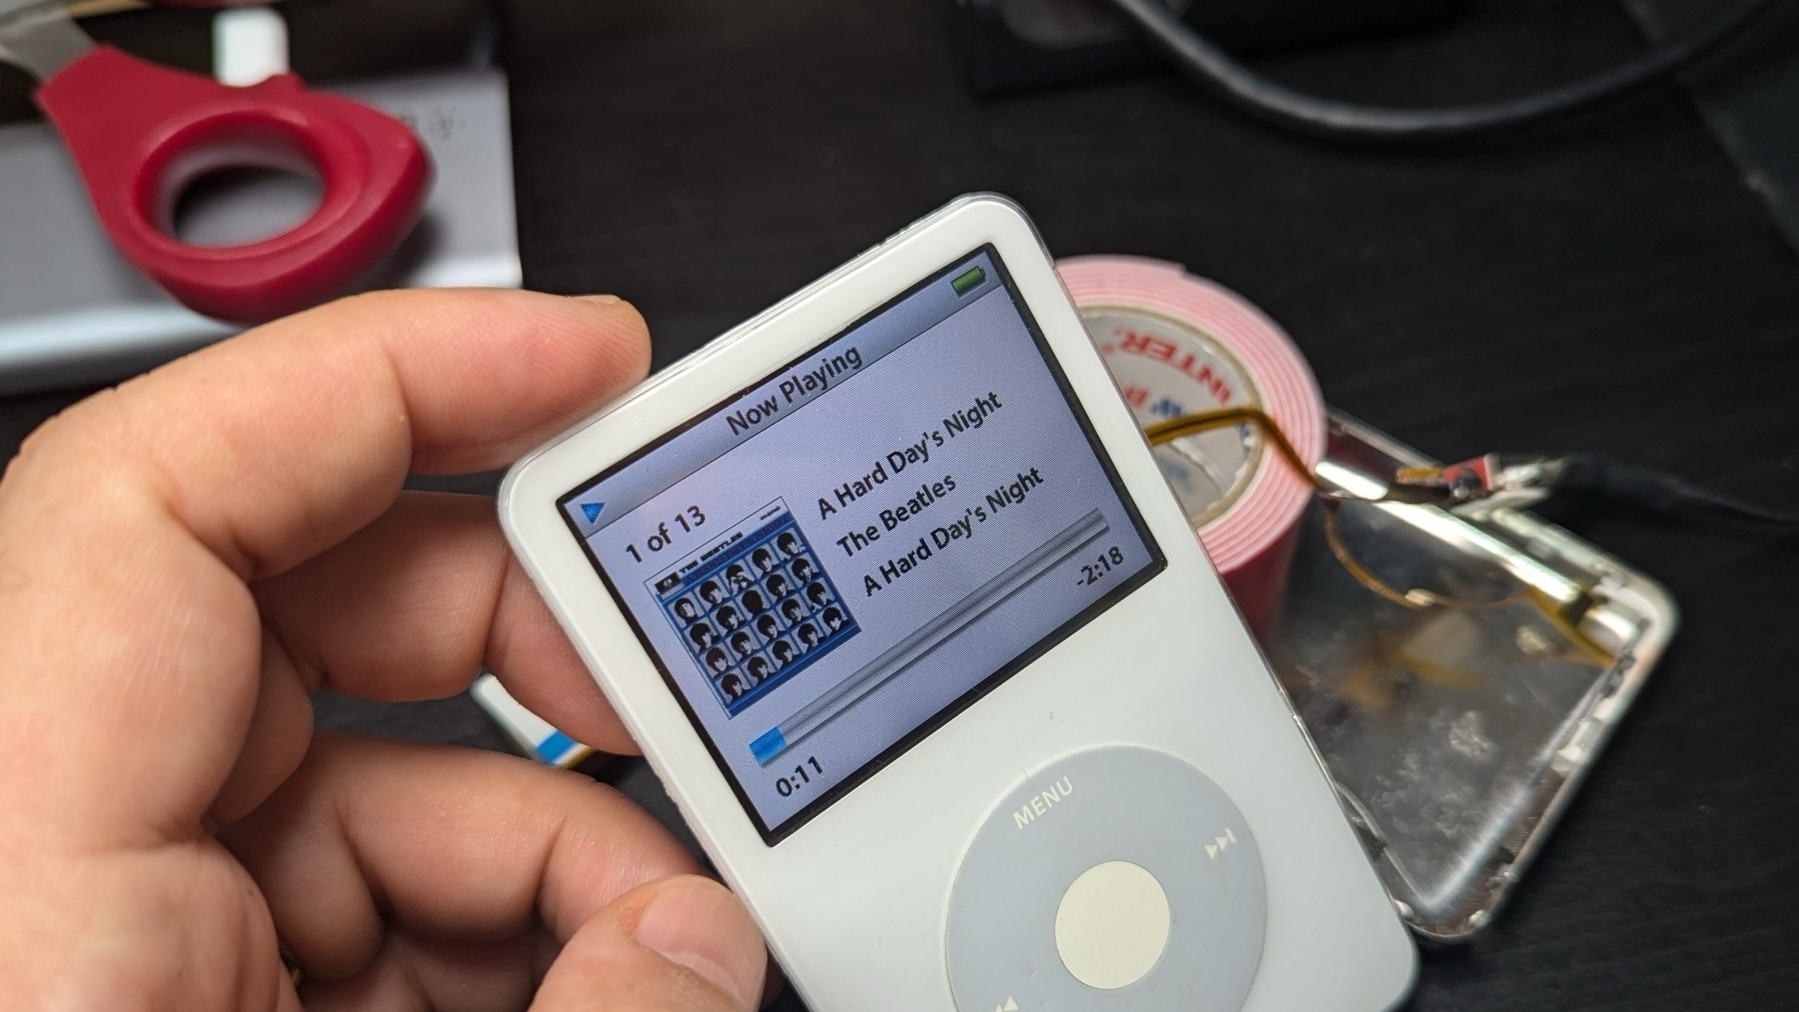
I have a generic double-sided tape with a foam inside that I avoid at all costs because it is the opposite of what 3M sells. It’s always difficult to remove it from anything, which means it’s perfect for my hack. You can see it in the picture above, showing the iPod circuits board. It’s the red rectangle.
Lesson learned
The iPod is not meant to be in pristine condition. It exists to play music, which is something to listen to, not to look at. And before you start talking about vinyl records and cassette tapes, I grew up listening to those, and I can appreciate how the experience can also be immersive. But I see the iPod 5.5 in the right spot to bring together the best of the past and current experiences of appreciating music.
It can hold my entire music library, and thanks to the SD adaptor hack, I can even expand the storage space if I need to. Then, there’s the click wheel, which makes the music selection as manual as it can be in a digital music player, without adding any friction to the process. And, believe it or not, I’m still able to use Apple Music on my modern MacBook to synchronize all my music with this masterpiece of its era.
My music. No subscription.
Have I mentioned it even has a headphone jack?
An almost hidden setting on Mastodon Lists brought joy to my feed again
Tired of your Mastodon timeline being overrun with noise from big accounts? I’m using a simple trick to reclaim my feed and focus on the conversations that matter most.
When I started using Mastodon, all the conversation going on made me feel like I was going back to the old days on Twitter. I found it so enjoyable that it eventually became my primary social media platform, and it remains so to this day. However, at some point, all those remarkable conversations disappeared.
It took me a while to understand what was happening, but I eventually figured it out. As news and tech groups started joining Mastodon and other ActivityPub platforms, I naturally began following the ones I cared about. But because they post so often, regular people’s thoughts and conversations are constantly drowned out.
I tried so many strategies, for example, unfollowing some news and tech accounts, but that didn’t make the others more prominent. As usual, the solution was right in front of me all the time. Using the Lists feature on its own wouldn’t work, but there is a configuration I missed all this time. There’s a way to hide from the timeline everything that is in a list.
The solution I came up with was creating the News and Tech lists, adding the respective accounts to each one, and setting both to ‘Hide the posts there from home’, aka the main feed. I’m loving this. The conversations are back to my feed, and I can always go to a list to check the sea of posts there.
If you would like to try it, here’s how you do it:
First, you have to add the accounts to a list. This will take time, but it will be worth it. Go to a profile, click the tree dots, and select ‘Add or Remove from Lists’.

Don’t worry if you don’t have any lists, you can use the ‘Add’ button to create them on the fly. If you already have a list, just use the add button.

Repeat the above for all the accounts, and stay with me. There’s a last step. Click the Lists icon on the sidebar. This is how you’ll be able to read all the posts from each list, but for now, they are still showing up on your main timeline. Open one of the Lists and click on the gear. Switch on the ‘Hide this post from home’ option, and there you have it.
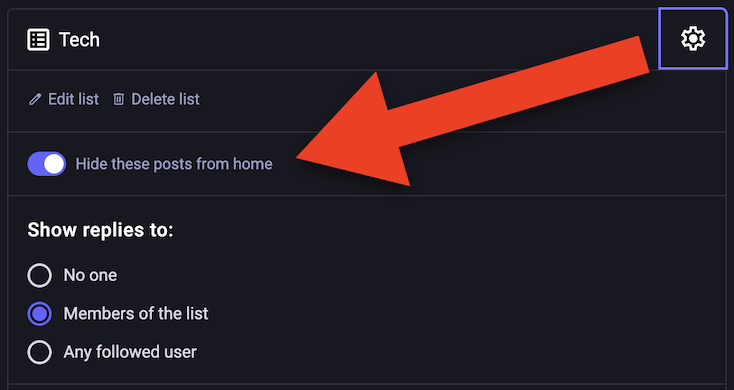
The old posts will still be on your home, but from this point on, the new publications will only be shown inside each list.
I love this. It’s a simple and elegant solution that provides me with the best of both worlds. Great conversations and thoughts are back on my main feed, and when I want to check the news, it’s just a matter of going to one of my Lists.
I was jogging as if nothing had happened, and suddenly I saw this big tree blocking the path I usually take.
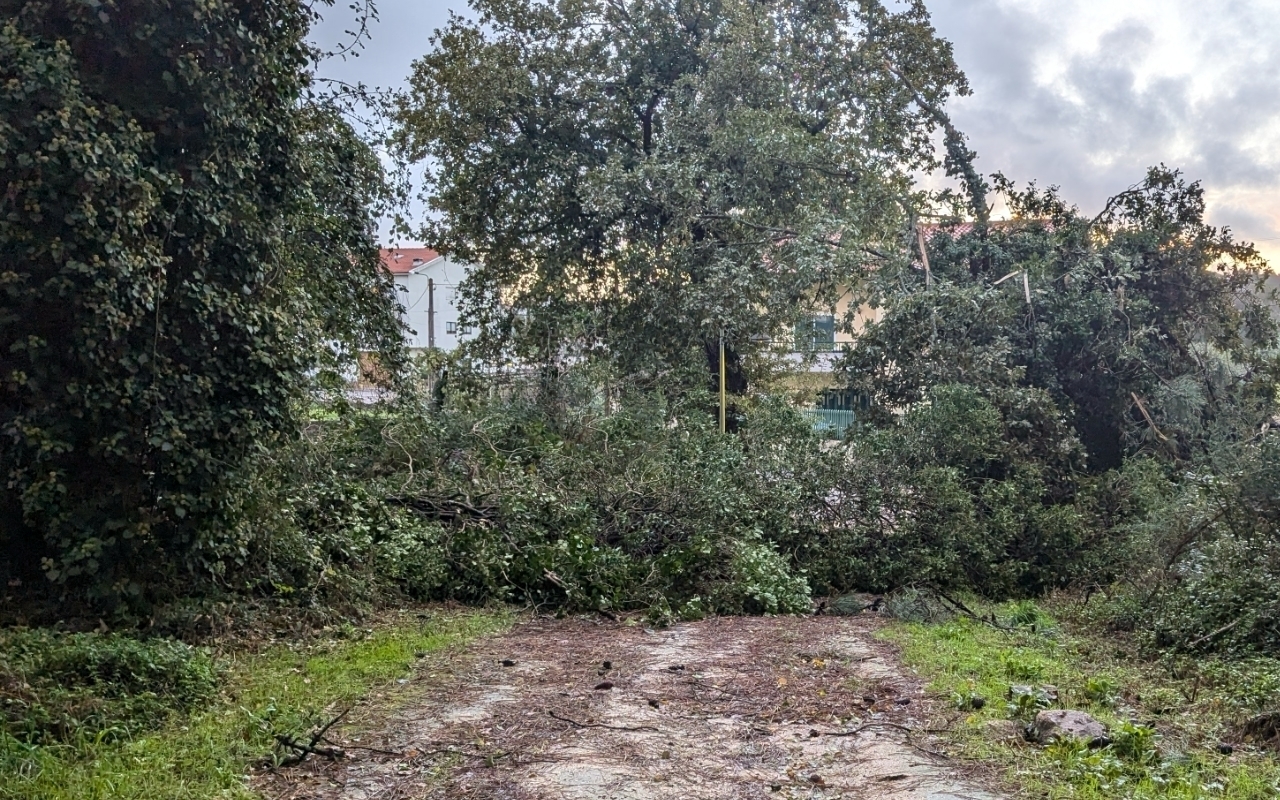
We’ve been getting “Severe Weather” and “Coastal Event” warnings for a few days, and today we woke up to severe winds. Then, about noon, the weather started to return to the norm, and I could even run at the end of the day. Things were not so normal, though. There were branches and scattered materials everywhere.
Porto went from wildfires to storms and strong winds in the span of a few weeks. It seems to me that Mother Nature is pretty unhappy with us humans.
First, explain what it is, then make it look nice
Picasso once said, Inspiration exists, but it has to find you working. In other words, one must be doing it — putting itself into the zone — to finally find the solution.
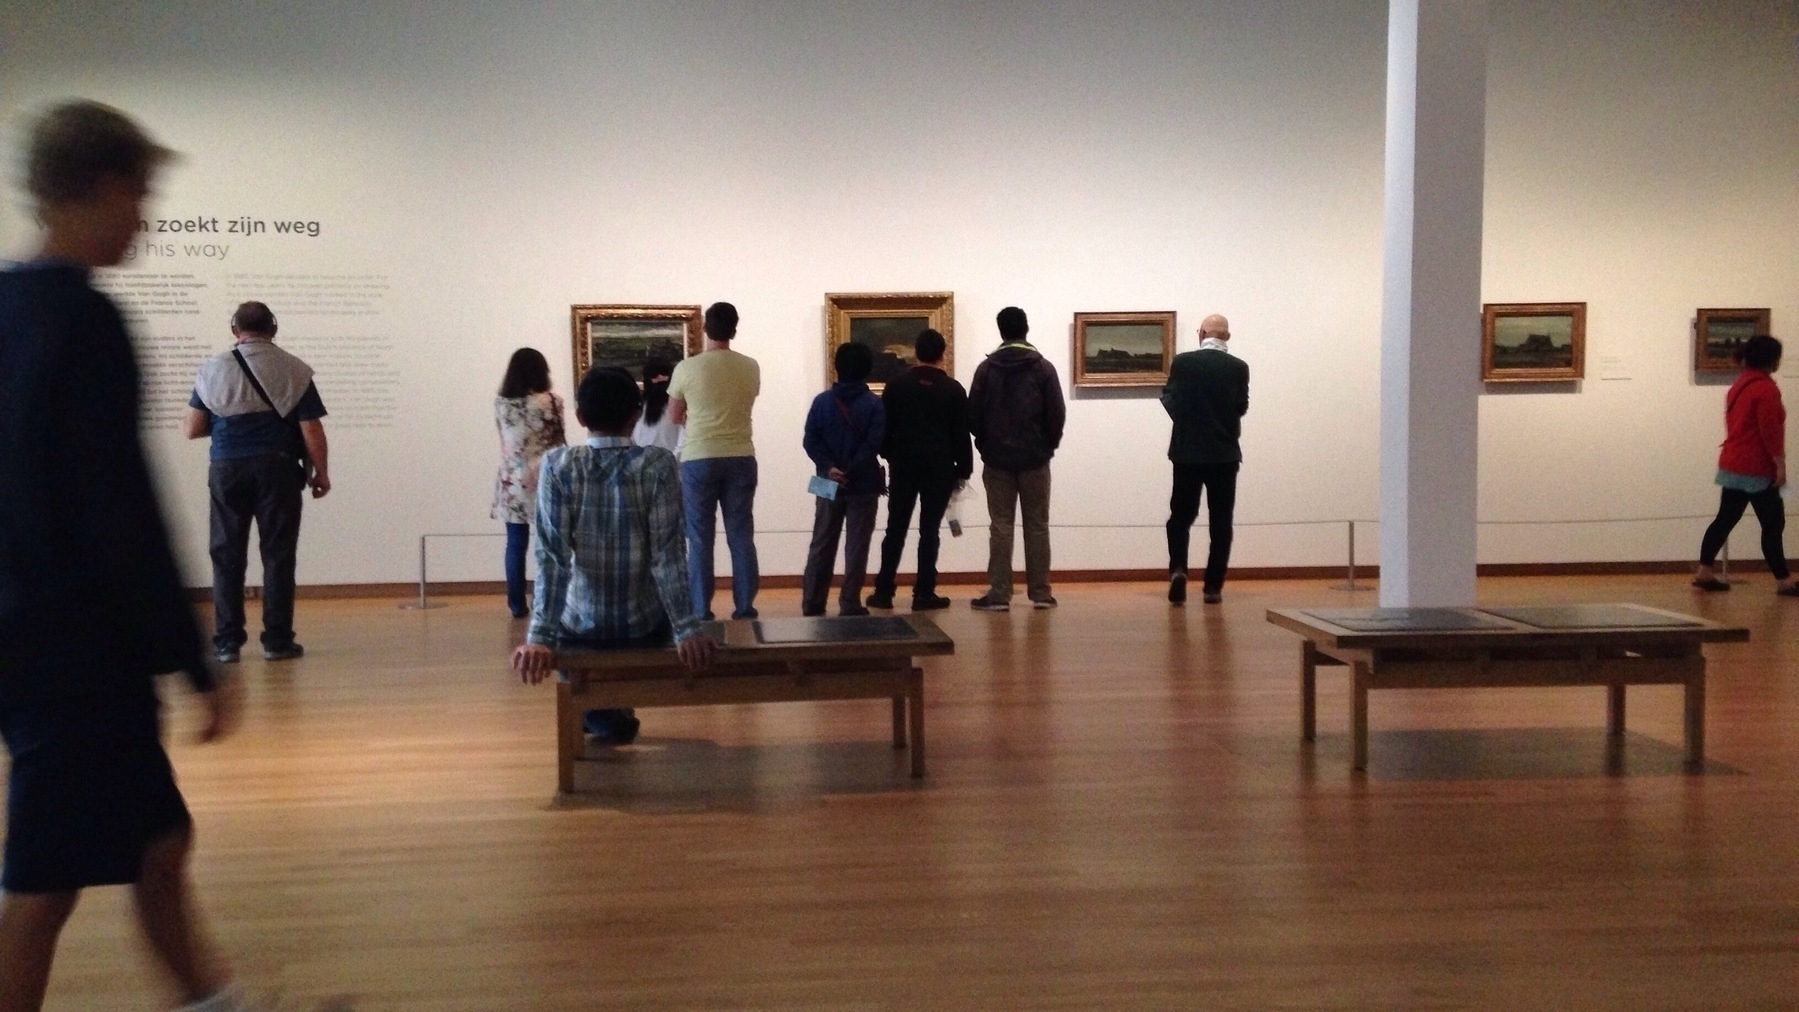
This is evident in Picasso’s museum in Málaga, Claude Monet’s house and garden in Giverny, or Van Gogh’s museum in Amsterdam, where you can see these master’s art in a chronological order, starting from the beginning of their careers.
It’s been a while since I’ve published anything on my blog, but this doesn’t mean I’m not writing. On the contrary, I’ve been incessantly working on my book. But that, on the other hand, doesn’t imply that I’ve made a lot of progress. In reality, it was only today, after starting the third draft, that I was finally happy with the book format.
In addition to Picasso’s mantra, what helped me find my way was a strategy I use when I can’t figure out a solution. What frequently helps is to first explain what it is, then make it look nice. Ironically, that doesn’t seem like it applies to understanding art.
Anyway, when I restarted the book for the third time, I did it from the middle, explaining what the Containers of Information are. It was then that I gradually began noticing that parts of it connected to many things I had already written in the two previous drafts, which I started repurposing.
Another strategy I tried was to use Obsidian Canvas to create a simple diagram of how the book should be structured. That’s what you see at the beginning of this video, but that was also a first draft. I moved those boxes around a lot and created new ones until I finally found the structure I was looking for.
Some people might see it as working twice or three times, as it was in this case, but if that means a book structured in a way that’s easier to understand, I’m fine with it. Furthermore, the parts that have already been written are being put to good use in a different order in this new version, which leaves me with a mystery to solve: how could authors do it with typewriters or, before that, pen and paper?
Those were the real geniuses.
✍️ PS. If you are not familiar with the Containers of Information concept, you can learn more about it by watching the first part of the video below. Even if you are not an Obsidian user.
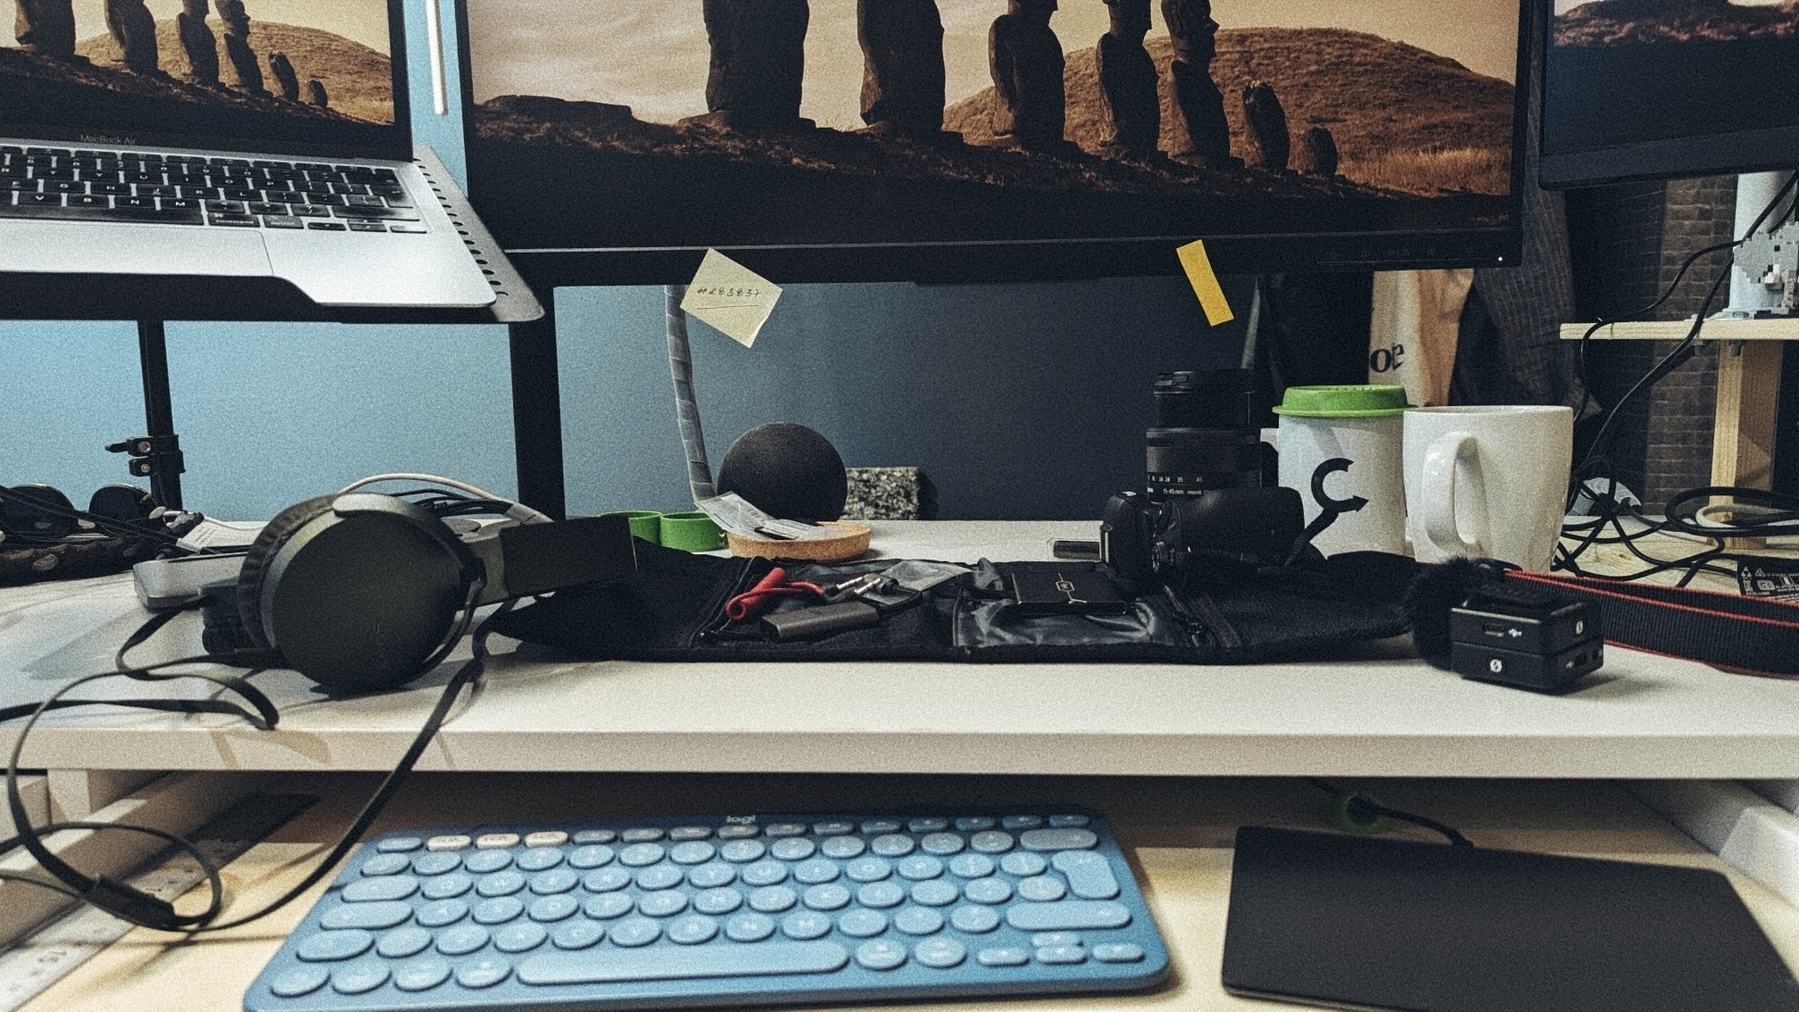
My cluttered workspace 🫣
I took the pictures below to illustrate a point in a conversation I was having on Mastodon, but something unexpected ended up happening.
I arranged my desk so that I can comfortably type on the K380 and, at the same time, easily reach the Touch ID sensor on my MacBook Air. At my right, not visible, there’s a Mac Mini and another screen where I produce my videos. I use the same keyboard and trackpad through Apple Continuity.
It took me many trials and errors, but I love this arrangement. Not only that, I’m proud of my creation. I built several of the parts, including the sliding extension for the keyboard. Everything is easily accessible and highly efficient. Now, can you guess how the AI-generated captions of the pictures start the description of my desk?
“A cluttered workspace”. 🤪


The video below will give you an idea of my workspace. It’s from 2023, and I have made minor adjustments, as predicted at the end of the video. Nevertheless, the computers and most of the items remain the same.
Apple is still in a much better position
Based on the videos I watched, the Orion AR glasses appear to be a huge step in the right direction. However, when I look at the entire kit, I cannot help but think that Apple is still in a much better position.
All the data processing being done by that little brick can probably be handled by an iPhone. As for the wristband, guess what? There’s an Apple Watch that, by the way, already knows a thing or two about gestures. Additionally, I’m pretty sure Apple is gathering a lot of data from its own AR headset users. But, the most important element is the well-known walled garden.
If Apple feels threatened by a future commercial version of Meta’s product, I bet they will release a kit similar to the one I described above.
Strip down Evernote and go back to basics to focus on notes.
Tired of Evernote’s clutter? Too many features overwhelming you? This is how you can strip it down to a pure note-taking app.
Those of you who have already watched the video at the end of this article, know how happy I was when I first tried that new Sidebar Configuration feature. I was both nostalgic and overjoyed to see my decade-old companion working as a note-taking app again.
If that’s also your goal, here are some tips to convert Evernote into a plain, simple#note-taking app. But first, make sure you have the correct version. The settings below are only available on version 10.107.3 or later.
Removing Distractions
Click on your name in the top-left corner of the screen, open the Settings menu and go to the Sidebar tab.
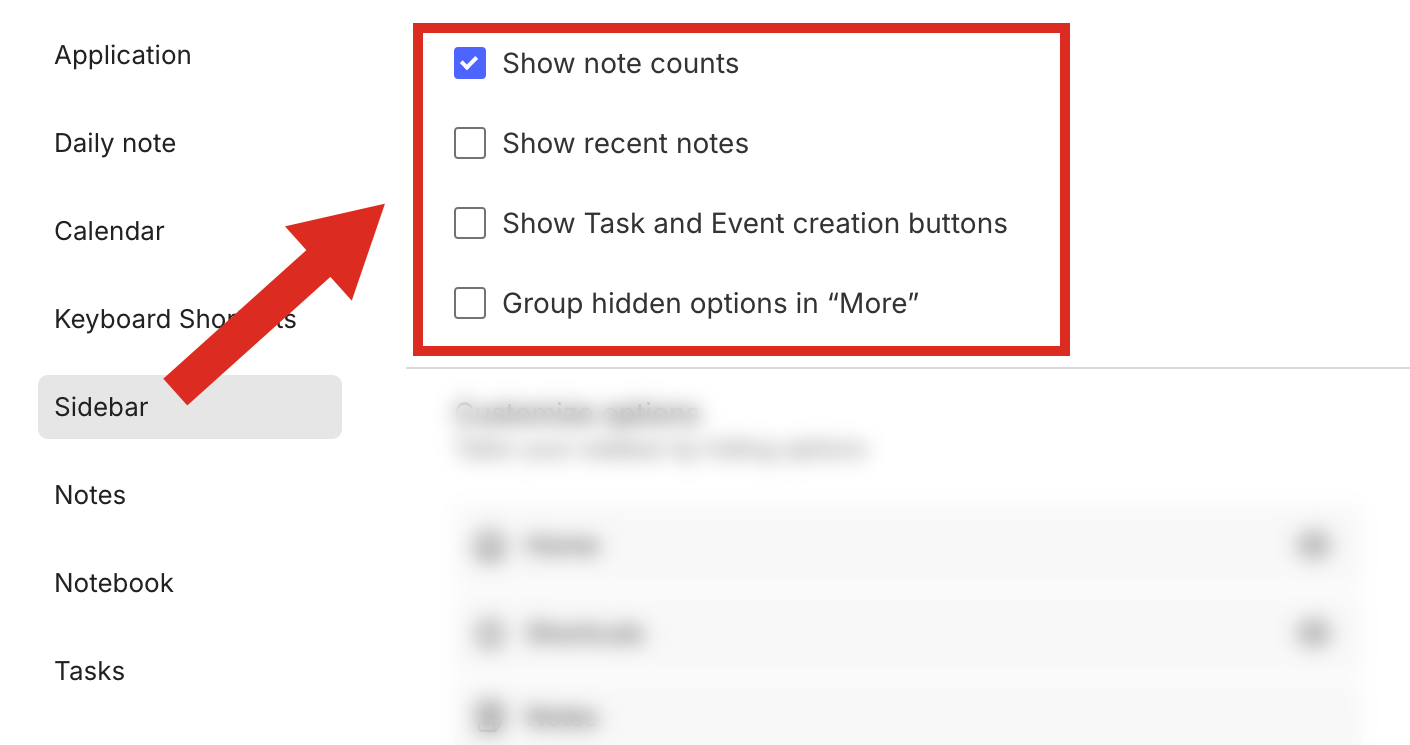
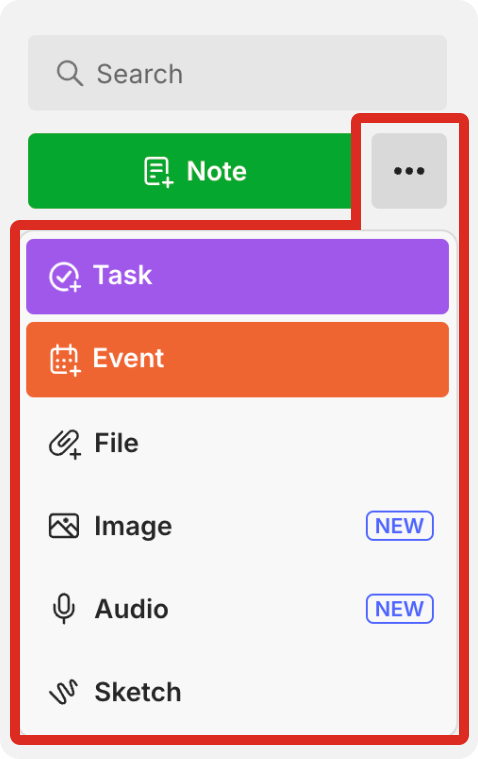
Uncheck the Show Task and Event Creation buttons option to remove the big, super-distracting purple and red buttons from below the Note button. However, as a reminder—or tip—they are still accessible by clicking on the three dots.
The Show note counts is an important element in my Timeline System and I kept it checked. As for Show recent notes, I prefer them on the Home page because I can see the thumbnails. As a side note, both of these settings have always existed.
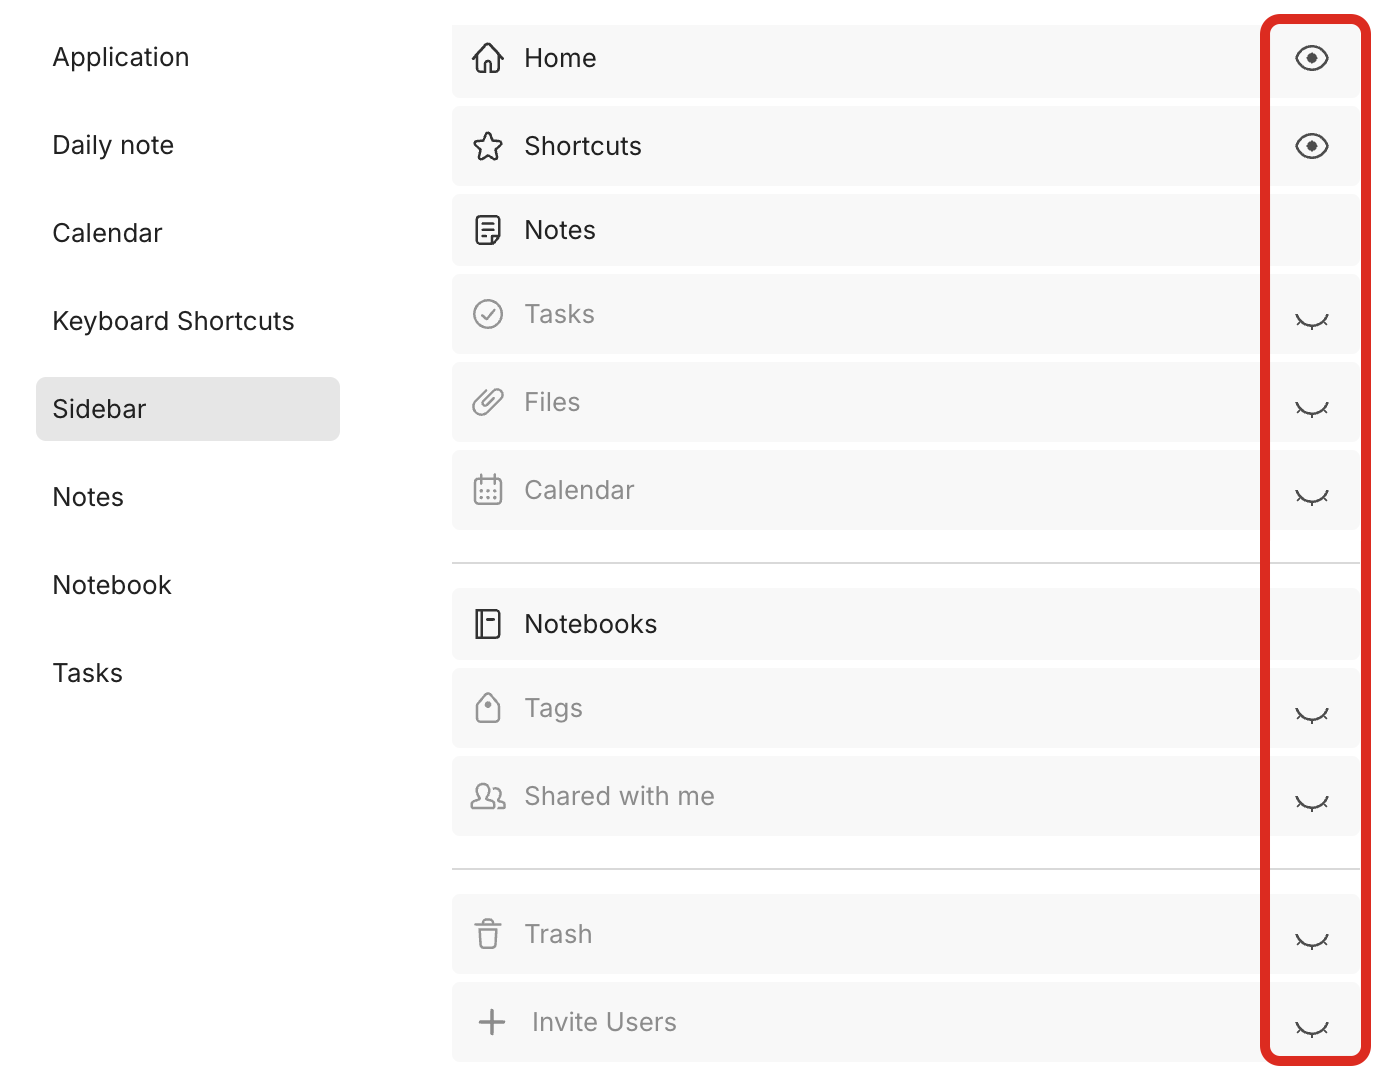
We’ll soon get back to the last option on that list. For now, scroll down to the section below and click to close as many eyes as possible 🤣. Jokes apart, Here’s what I left visible on my sidebar:
- Home
- Shortcuts
- Note
- Notebooks
We are not done yet, but I need to take a moment to share a tip with those of you who love keyboard shortcuts.
Keyboard Shortcuts
Even if you remove, for example, Home from the side menu, you’ll still be able to use the option + command + 1 keyboard shortcut on a Mac to open Evernote Home. And that’s true for many other items. To open the Tasks page, you can use option + command + 3. The Calendar is option + command + 5.
To see all the available shortcuts (Mac or Windows), click on the keyboard icon on the lower-left side of the Evernote desktop app and go to the Navigation section.

Hiding Everything
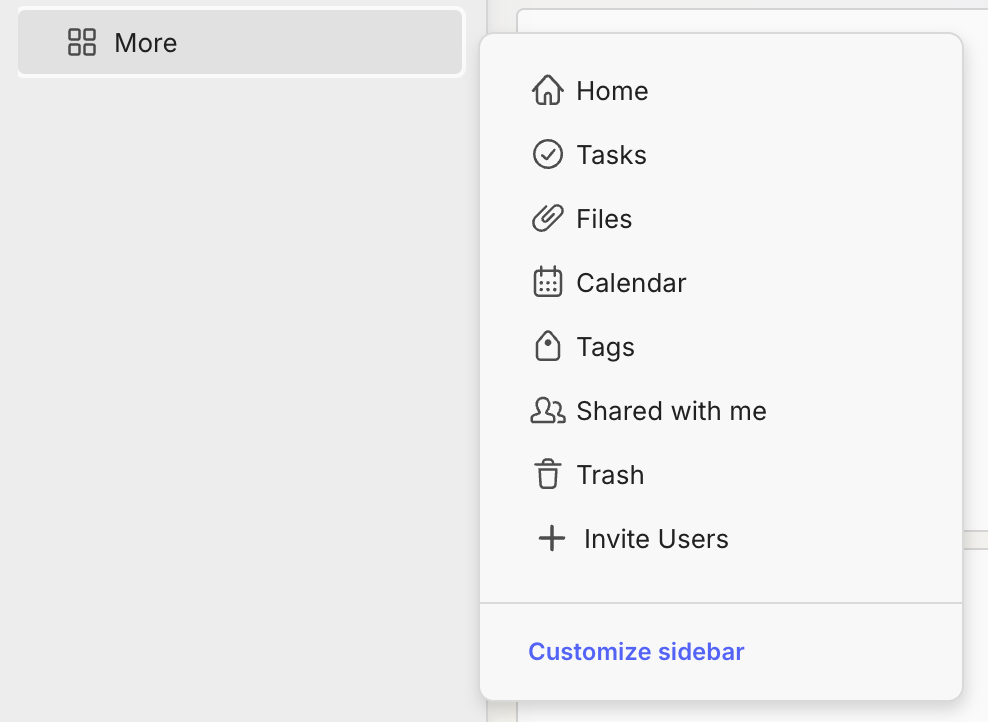
Let’s return to the top section of the Sidebar tab and discuss the Group hidden options in More. This will create a four-square icon that will provide you with access to the items you just made hidden.
I want the cleanest sidebar as possible and, in my case, I also unchecked this option. But, as everything else in this article, this is just how I’m doing things on my Evernote. There are many combinations that you can and should explore to find what’s the best for you.
Only Notes
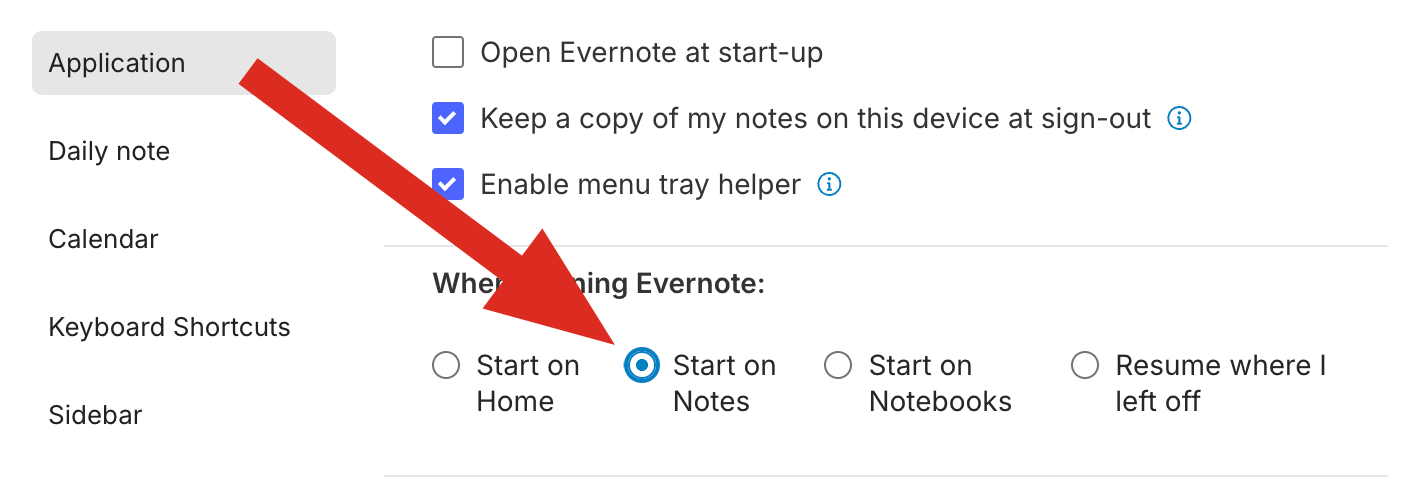
We are almost there. If note-taking is your focus, go to the Application tab, and select Start on Notes under the When opening Evernote section. This will open Evernote on your notes list as it used to be before Evernote 10 was introduced.
Congratulations! Your Evernote is back as a note-taking app now. But if you need it, there’s always a calendar and list of tasks a click away on Home. To learn how I set up a minimal Evernote Home, you can watch this other video.
Express Your Love
Now, if you truly love Evernote and take many notes every day, why not automatically open the app when you turn on your computer? Since you are already on the Application tab, check the Open Evernote at start-up option. That’s how you show your true love 💚
Have Fun 😆
Finally, go watch the video below to make fun of me trying to find the Show Task and Event Creation buttons option.