Obsidian
- If you move that note to another folder in your vault, the page address will change if you update it. And the last thing you want is your site pages changing addresses.
- I’m not an SEO specialist, and there is conflicting information about this online, but some say the address format is an important signal. I have no idea whether it’s critical or not, but the address created by Obsidian Publish looks horrible.
- Wait for four hours before sharing the permalink on social media.
- Use the original link instead. That link will always exist, even if you create a permalink. Also, it doesn’t take four hours to show the image.
- First you have to find you Kindle serial number.
- Then you can follow this instructions to instal the DeDRM_tools plugin
The Multi Properties plugin was a lifesaver for my recent project (you know, that one 😉). It made adding and removing properties from several #Obsidian notes super easy. If you’ve been looking for a way to do that, I just published a video explaining exactly how to use it.
I finished importing all my #Obsidian #Markdown notes (posts) into Micro dot blog. Of course, there were some glitches and some problems I created myself, but overall it was as easy and simple as something like this gets. I took many notes along the way and had many ideas that I intend to share in a longer post and some videos.
One thing I would love to be able to do on #Obsidian would be to click on a file in the files list and then use the up and down arrows on the keyboard to switch from one file to another on the list. 🤔 Hmm, there’s probably a plugin that can do that.
My entire website was created using Obsidian notes, all written in Markdown. I already knew that Micro.blog supports Markdown, but when I started entertaining the idea of moving my site back there, I found out about the Markdown import feature, which uses the Frontmatter (Properties) for the post title, publication date, URL, and even tags.
After a few hours testing the tool with some of my posts, I was ready to start cleaning all of them, so I copied them to a new Vault. The Multi Properties and Global Search and Replace plugins were so useful that I’ll probably publish videos about them.
There are people who see Obsidian as a tool for developers, but when I find and use plugins like the above to perform complex tasks with a click of a mouse, what I see is a powerful tool making anyone’s life much easier.
PS. The website migration process is still in progress.
The more I share my ideas, the more ideas I get. I just made a small improvement to the Tasks system I created on my #Obsidian Home Page. Video coming up soon. Maybe today! 😉
It seems like you don't have to wait four hours like they said in the official Obsidian Forum.
After additional experiments with sharing the #Obsidian-Publish permalinks on social media, I discovered that if I do so two hours after the page goes live, the image will appear on the social media post. I haven’t had any luck with a one-hour wait, though.
Next, I’ll try one and a half hours 😉
UPDATE: So, it looks like my two-hour theory is a bit hit or miss. I’m adding this update because it took a bit more than two hours for the image on this one to appear.
My Obsidian Publish infinite loop. The saga of creating new problems by solving others.
It’s incredible how solutions can have a side effect, creating new obstacles. And I secretly love dealing with that challenge.
Like usual, I’m sharing something I just learned. But let’s begin with the issue. If you use Obsidian Publish to post your notes, the address of the page will be something resembling the path to the note in your vault, which creates two headaches.
The solution to both is adding your own address as a permalink, which Obsidian Publish allows you to do with a property:
Long story short, all my notes have a permalink, but of course, that created a new problem. Do you know when we publish a link on social media and it creates a miniature with a thumbnail and some details about that post?
Obsidian Publish has some properties that you can use to tell the social media site where to look for that information: cover: or image: for the thumbnail and description: for the description. You can learn all about this on the Obsidian Help site.
That set me on a quest that led me to this Obsidian Forum post: “Pages with permalink take longer to have a social preview.” There’s a long conversation there, but here’s the TL;DR:
How to Find the Original Link
Open the Obsidian command palette, and type Publish: open in live site. That will first open the page using the original address and then switch to the permalink.
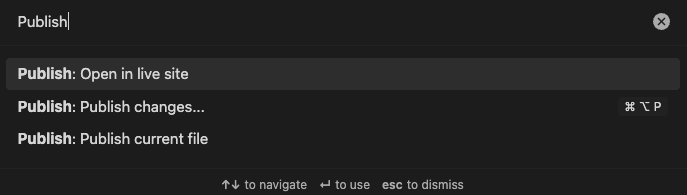
It’s too fast to see, but if you go to your browser history, you’ll notice that page appearing twice in the list. The older one has the original address. Right-click on it and copy the link.

Yes, I know what you are thinking…
I agree. It’s incredible how there’s always a side effect creating new problems. But don’t worry, you’ll be the first one to know when I find out how using the original address creates new complications.
Tweaking some Obsidian plugins (weekend housekeeping)
Yesterday, I spent some time adjusting the settings of two Obsidian plugins — Voicenotes and BookFusion. That inevitably got me thinking about how cool it is to have apps and services automatically send information to a centralized space. What’s even cooler is that even if Obsidian ceases to exist tomorrow, all the files will still be organized and available in my computer’s file system.
BookFusion
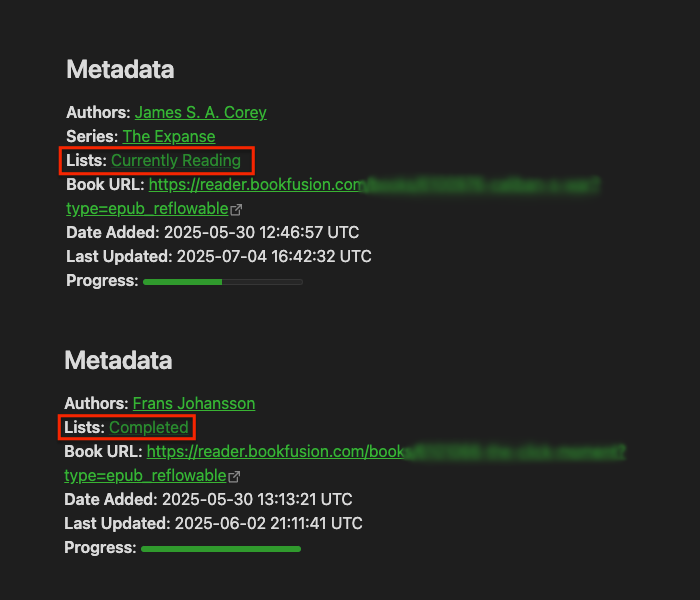
When making some small adjustments to what I showed in a recent video, I noticed that the plugin isn’t creating “Lists” in my vault. I even went back to my video and realized that this issue was already present back then.
Anyway, if you look at the images below, you can see, by the lighter green link, that the notes “Completed” and “Currently Reading” don’t exist in my Vault. In other words, the plugin isn’t creating them, even though I have all “Index” options set to synchronize.
By the way, if you’re having trouble understanding what I’m talking about, please watch this video.
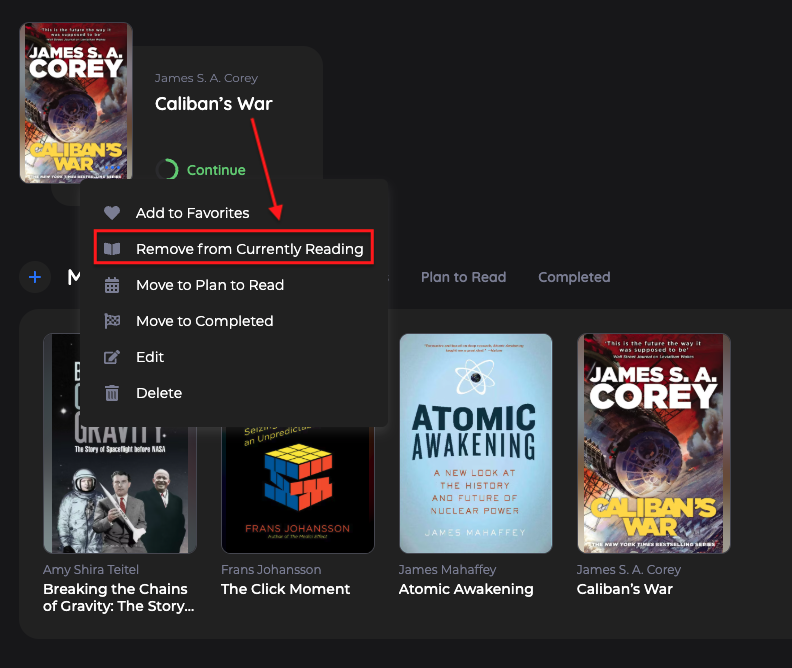
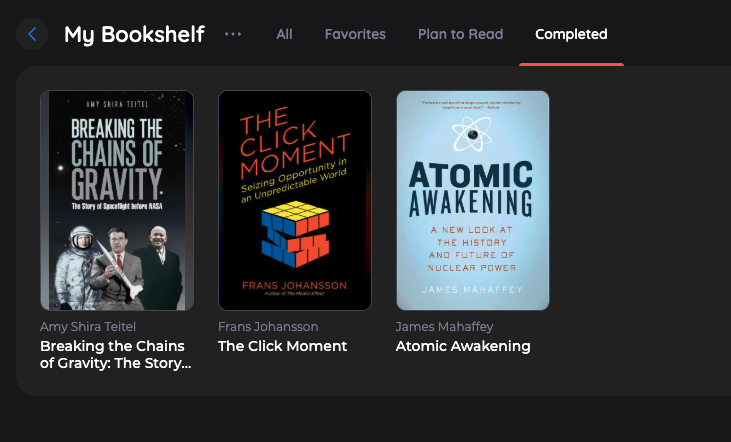
Looking at the images below from my BookFusion dashboard, you can also see that the book Caliban’s War is in the “Currently Reading” list and the three others are in the “Completed” list.
It’s possible I’m doing something wrong, but after checking all settings and not being able to figure out the problem, I decided to email the BookFusion team. I’ll update this post when I hear back from them.
Voicenotes Unofficial Plugin
I’ve been testing the Voicenotes Pages feature to produce a video about it, which is why I decided to also dedicate some time to make adjustments to the plugin settings.
Again, I’m not sure if I’m the one doing something wrong, but it looks like the variable that creates the title for the note is also including the date.
Then, there’s a suggestion. As you know, I like to have all my files in the Files folder in my Timeline, but the plugin doesn’t let us choose where to save Voicenotes attachments. My suggestion was to allow us to do that.
That’s it for this one. I just wanted to share the recent updates because, as you know, I’m always tweaking things around here.
Experimenting with Voicenotes integration into Obsidian blog
Note: Originally posted on my Voicenotes Page.
I’m using the unofficial Voicenotes plugin in Obsidian and I have it set to download everything. Not only the text but also the audio, the attachments, everything. I even have some properties that will capture links, the title, and a lot of other information.
So, I’m here thinking that maybe it is possible to create a copy of this post—that I’m adding to Voicenotes Pages—in my Obsidian blog.
Well, it’s not “maybe”, it is indeed possible because, ultimately, it’s also being created as an Obsidian note. All I have to do is set the plugin’s template to download the post and everything else but with the appropriate properties, the ones that I use to publish on Obsidian Publish.
Hmm, this is an interesting experiment. Let’s see how it goes.
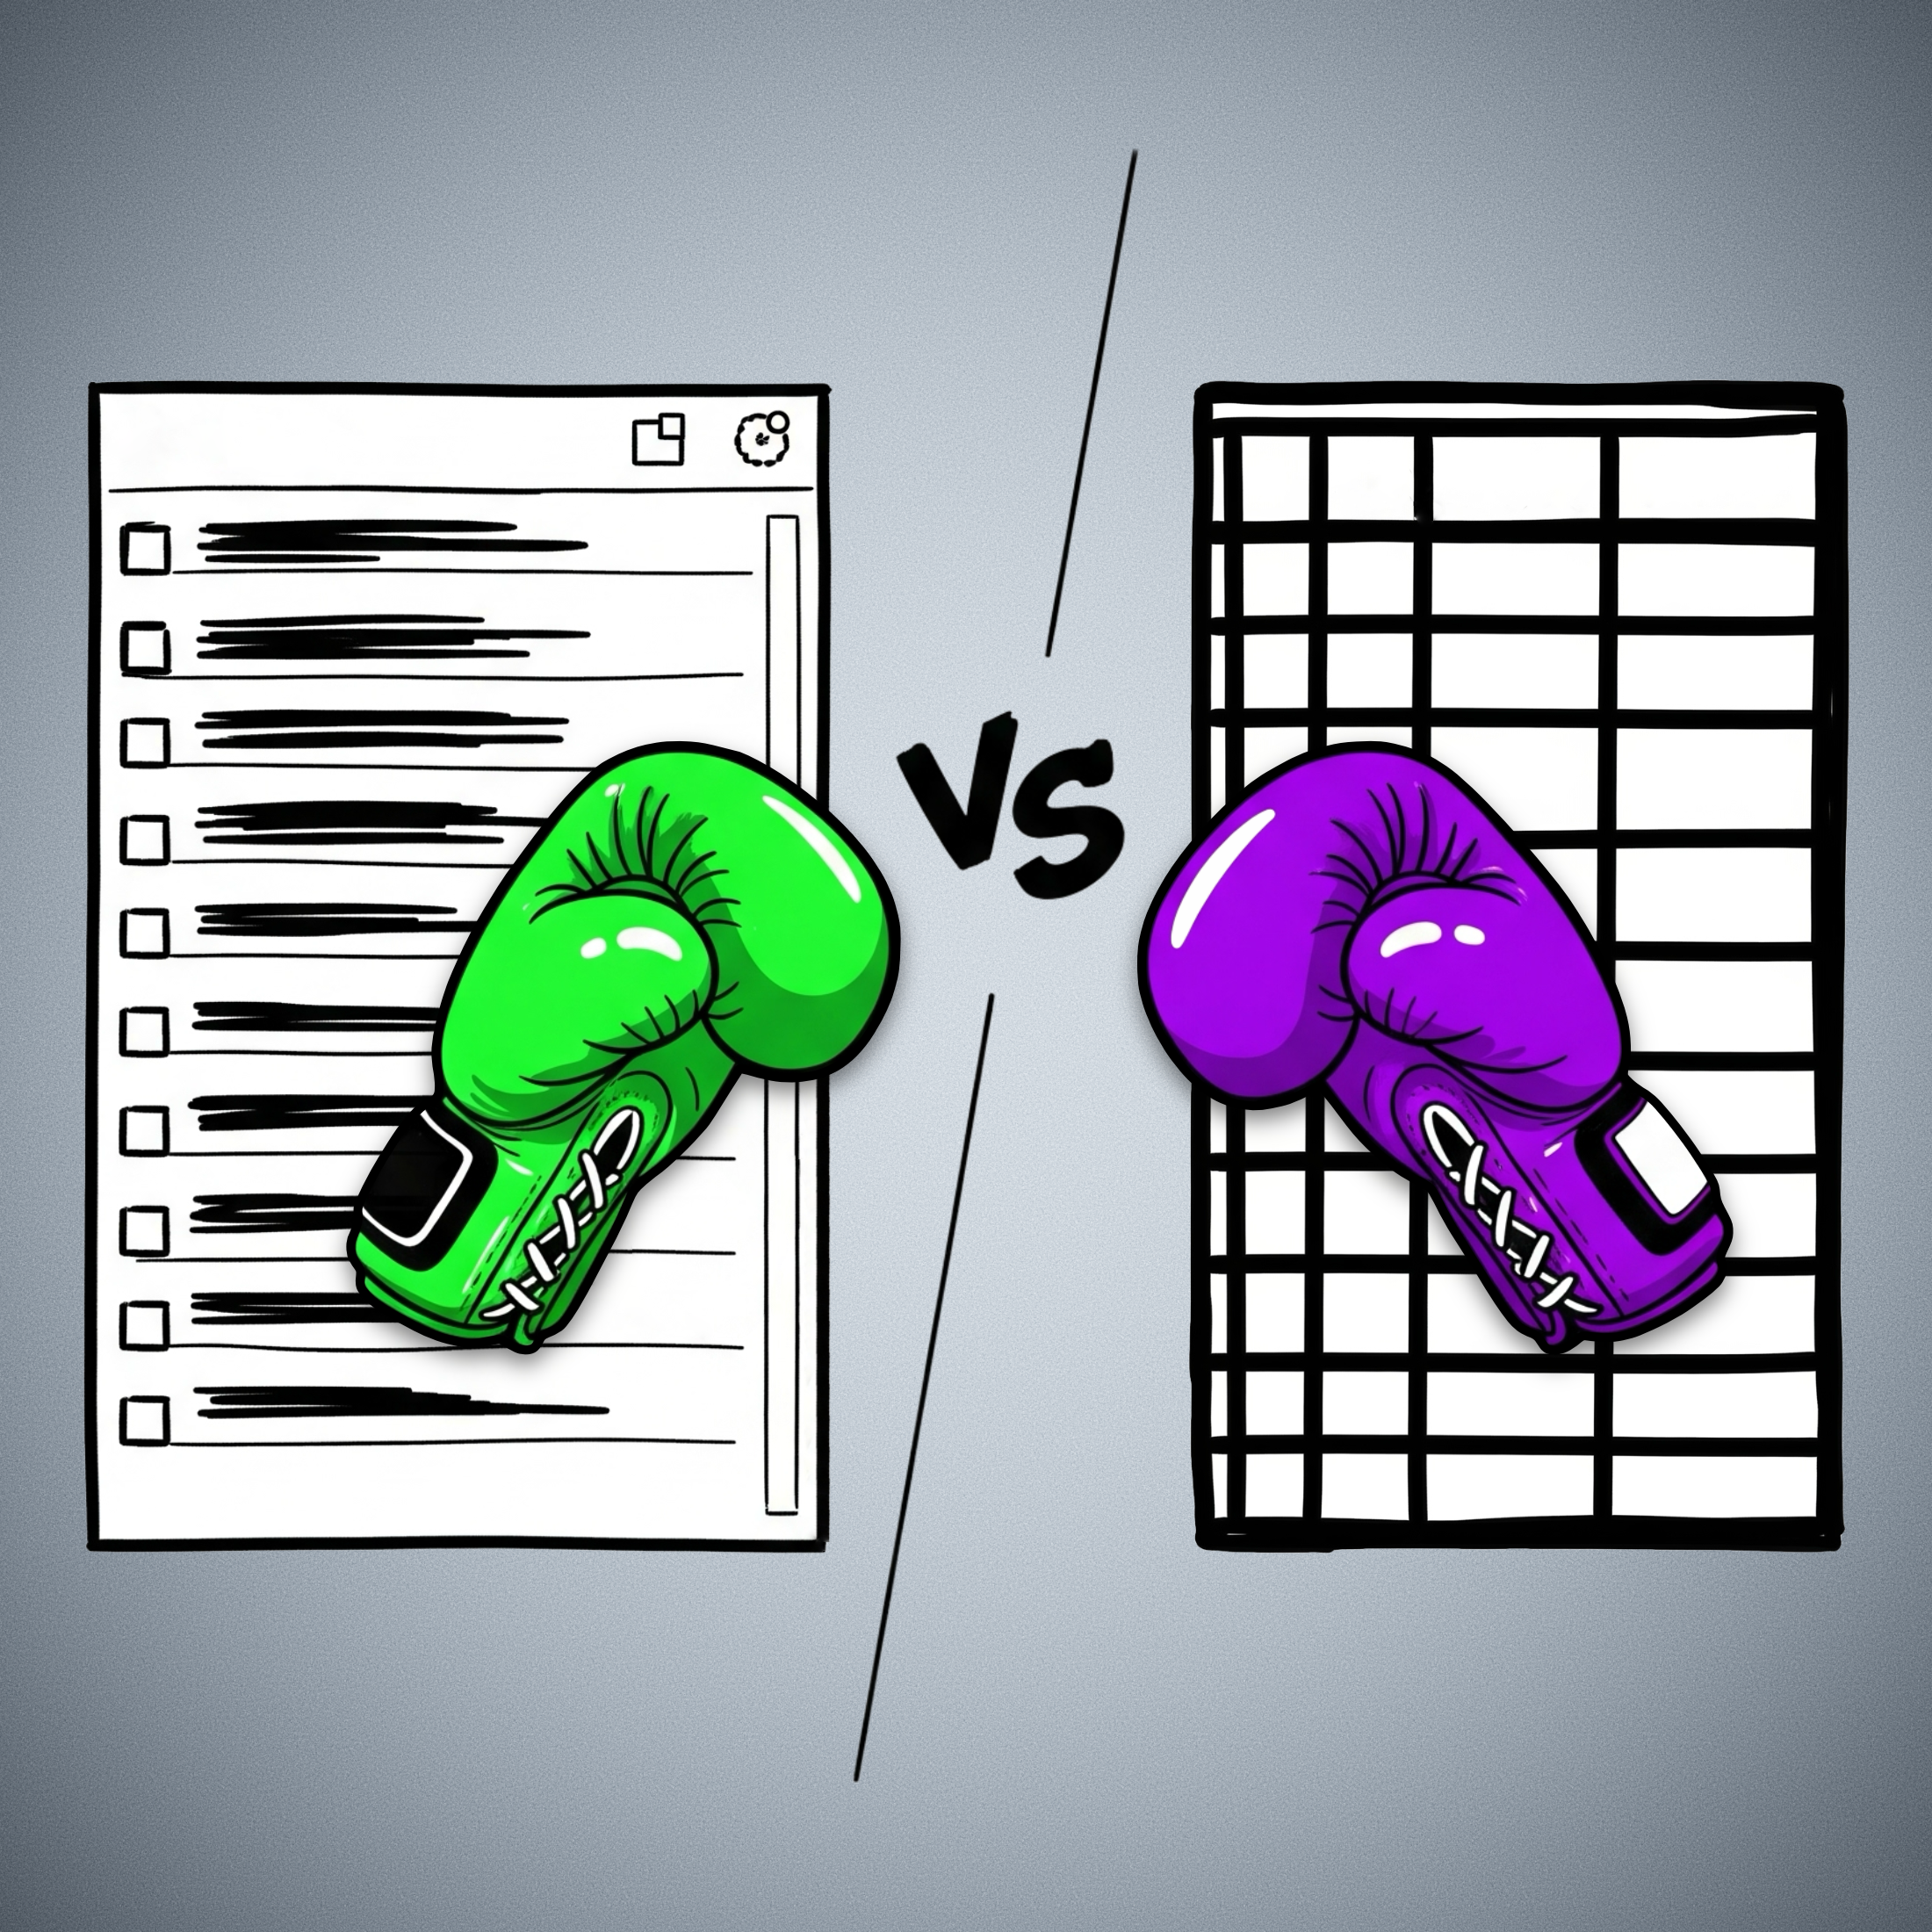
Refining my note-taking workflow—lessons from Evernote for Obsidian.
As someone who believes that serious note-taking needs a solid system, I’ve frequently encountered a challenge: effectively managing my ever-growing collection of notes.
Dynamically switching between multiple views of the same information is a strategy I used a lot in the past. However, I lost that when I moved to Obsidian, as I find its handling of lists of notes less intuitive than Evernote’s elegant approach.
I can’t think of any note-taking app that handles note lists quite like Evernote. Its “All Notes” list is essentially a dynamic filter displaying all your notes. If you’re an Evernote user, you’ve likely noticed that the list automatically refines as you click on notebooks, tags, and so on, transforming to show exactly what you need. This brilliant method of listing notes is something I truly miss in Obsidian.
When you select a notebook, tag, stack, etc. in Evernote, the items in the list are filtered to show only notes within that group. So much so that you can easily replicate this filtering using the advanced search operators.
For example, typing tag:tag-a in the search box yields the same list as clicking on the tag-a tag. Evernote’s AI-powered search functions similarly; the displayed items adjust based on the elements the AI selects to create the filter.
In Obsidian, however, filtering notes by a tag or using the search box will also list the items, but I’m limited in what I can do with the results. While I can clearly see the list, there’s no way to select all items and, for instance, add a tag to them or move that group of notes to a different folder.
In Evernote, this is not only possible but incredibly easy. You just select and move them to another notebook. While a limit on the number of selectable notes exists now, it wasn’t there before Evernote 10.
This clever way of displaying notes does come with technical challenges, though. For example, I believe the current selection limit was imposed because, in the past, moving long lists often led to significant conflicts.
Because there’s no easy way to filter notes in dynamic lists like in Evernote, I opted for subfolders within my Timeline System in Obsidian. But by doing so, I sacrifice a true timeline of my life’s events, as each type of information is located in a separate subfolder.
I haven’t tested Bases yet, but judging by the official documentation, it appears there’s no limit to the size of lists a Bases file can handle. If true, I’ll finally be able to build a real timeline by creating a single Timeline.base file that lists everything from the subfolders within my Timeline folder. Not only that, but I’ll have access to various dynamic filters within that Timeline.base file.
While I’d prefer not to, if the number of files proves too large for the new Bases feature to handle, I can always split it into yearly files: 2025.bases, 2024.bases, 2023.bases, and so on.
It will not be a perfect replacement for Evernote’s list of notes, as I will not be able to select multiple notes to add tags, move them elsewhere, and any other bulk action. But I’ll at least, have a real timeline and multiple possible filters.
The Bases feature is still in beta, and online discussions suggest the final public version will take some time. Meanwhile, I can ensure my Timeline notes have all their properties populated with the proper data, allowing my Timeline.base to beautifully simulate the visual effect of multiple views of the same list, just as I was accustomed to in Evernote.
Ultimately, my goal with the Timeline System is to create a note-taking system that truly adapts to how we think and behave, allowing us to interact with all the information we deal with in a fluid, intuitive way. Bases seems to be a promising step in that direction regarding using the Timeline System in Obsidian.
What about you? Any plans for the new Bases feature?
Como uso notas com tarefas no Obsidian
Um exemplo do dia a dia em que eu precisava juntar alguns documentos e depois solicitar outro documento via correios. Onde foi que guardei os documentos no Obsidian e como estou controlando o tempo de resposta via tarefas em uma nota.
Conteúdo Relacionado
Things you should know about Obsidian Publish — my struggles and how I'm dealing with them.
Obsidian Publish has been a game-changer for my online presence, but like any powerful tool, it comes with its quirks. Here are the hurdles I’ve faced and how I’m overcoming them.
A few days ago, I converted my blog to the Timeline System. If you are interested in more details, there’s a walk-around video that you can watch.
Photos Page
The “Photos page” was inspired by how Micro.blog handles our pictures. When there’s a JPG image in a post, that image will be displayed in a Photos page with a link back to the post.
My solution is more manual, like many other things on the website, but that’s okay. As all this AI buzz grows, I’m trying to find comfort in actually doing things with my type of AI in mind: Attention & Intention.
But don’t get me wrong, I use AI, the other type, all the time. For example, I had this long conversation with Gemini to help me come up with the CSS responsible for the /photos page layout.
Obsidian Publish Limitations
I am delighted with the progress I have made thus far. However, I have also encountered a few bugs and issues during the process.
Since I came back to Obsidian-Publish, I’ve been working hard on creating this mix of a blog and learning center. It has to be something useful for you, but, at the same time, I need a system that will make my life easy. Otherwise, I’ll just stop sharing.
You know that thumbnail when people share posts on social media? There’s a way to set an image to do that on Obsidian Publish. Although it’s a fairly straightforward setting, I never found it to be successful. And because of all the other work going on in the process of building my website, I never took the time to report this and investigate the matter.
Yesterday, I finally reported it on Obsidian’s official forum, which ended up leading me to mxstbr’s post about it.
The problem is some sort of incompatibility with the Permalink setting. I tested it on my website, and he is right. So, let’s hope the Obsidian team comes up with a fix to this.
The other issue is a site behavior that, in my opinion, doesn’t make any sense. As you already know, formatting notes in Obsidian is done with Markdown. But it’s also possible to use regular HTML.
What I found out is that any link that points to an external site will open that site in a new tab. First, I thought that I could solve that using a HTML link, but it keeps opening on another tab even if I use target="_self", which is a way to force the link to open on the same page.
After almost going crazy, I decided to inspect my website code, and, to my amazement, Obsidian Publish replaced the target="_self" with target="_blank", which is how we tell the browser to open the site on a new page.
Why? That doesn’t make any sense. We, the site owners, should be the ones deciding where the page should open.
Anyway, there’s also a complaint about this on the forum. So, let’s hope they fix it. For now, be aware that that’s the reason you’ll be sent to another tab when you click on one of my pictures on the Photos page.
No rel=“me”
This is another HTML attribute that is used by Mastodon and other services to make sure the owner of the website is the same person claiming to be that owner on another site.
It’s such a simple and easy setting, but because of the way Obsidian Publish code works, the rel="me" is not visible, and services cannot use it to verify ownership.
I’ve been complaining about this for a long time, but after being ignored for so long, I decided to come up with a workaround. Because I also needed a Linktree-style page, I created social.vladcampos.com on GitHub and that’s where I included the rel="me code.
Not everyone has time or knowledge to do this, not to mention that it’s not ideal. An official way to solve this would be to provide us with access to the <head> of the site via a file, just like we can do with the publish.css and publish.js files.
That, by the way, would address another issue. The Author Attribution verification. For that, regrettably, I could never come up with a workaround.
The Terrible RSS Feed
Finally, there’s the terrible RSS feed. I can relate to the challenges here, but there is already a feed, which, unfortunately, doesn’t make any sense. For starters, I don’t understand what the criteria used to order the notes are. If they could at least make it ordered by last created note, it would already be at least usable.
The workaround I came up with was to |manually create my feed. Unbelievable, right? It’s 2025! Anyway, I’ll do it again on my GitHub page and share the link on my Obsidian site and on the Linktree-style page.
But, please, don’t get me wrong; I’m thrilled with what Obsidian Publish is enabling me to do. It’s something I have tried and failed on so many other platforms, and it’s now a fascinating work in progress.
Como controlar o vencimento de documentos usando o Obsidian.
Como organizo meus documentos pessoais no Obsidian para acesso rápido e, ao mesmo tempo, controlo a validade de cada um deles.
Conteúdo Relacionado
Como guardo no Obsidian um arquivo que usarei só no futuro
Há situações em que precisamos guardar informações para um futuro e não temos ideia exata de quando necessitaremos destas informações. No episódio de hoje, compartilho uma estratégia que utilizei no final de semana.
Lidando com anexos no Obsidian
O Moacir Junior deixou um comentário com uma pergunta sobre como lido com anexos no Obsidian e este é o tema do episódio de hoje.
My super simple Google Calendar hack for Obsidian
Having both Obsidian and Google Calendar constantly open, was driving me a little crazy because of all the back and forth. Now, one click and I’m there. So simple, so helpful.
Yes, I’m aware of the calendar plugins, but, after trying several options, I’m not happy with any of them. So, I came up with a temporary solution that, to be honest, I’m using for a while and, at least for the moment, it made me stop pursuing other alternatives.
Despite its simplicity, it’s been a game-changer for me, and that’s why I decided to share this hack with.
What I did was use the relatively new Web View feature to open Google Calendar inside Obsidian. But there’s more. I also set the Google-Calendar tab as pinned, which makes it always open when I open Obsidian. And because I use Obsidian in dark mode, I also set Google Calendar to dark mode, and it now blends perfectly as if it is an integral part of Obsidian.
If you are having a hard time visualizing all this, you can watch the video below. In my case, I had to also change some setting on another plugin, the ‘Hompage’, which I also explain why and show in the video.
I freed my Kindle library and have it synchronized with all my devices
First, I converted the books to ePub using Calibre. Next, they joined my Timeline System in Obsidian for automatic synchronization across all devices, Supernote included.
Like many other modern conveniences, the Kindle ecosystem is built to keep us locked in. As you know, I’ve been taking down walls around digital goods I won, and now it’s time to do it with my books. This project has been on my list for a long time, but it was a recent feature removal from Amazon that motivated me to finally pull the trigger.
We used to be able to go to Amazon.com and download our Kindle books, but that’s not possible anymore. A while ago, when Amazon announced the policy change, I downloaded all my books. If you haven’t done that, I believe you can still have access to them by connecting your Kindle to a computer and manually coping the books.
But having the books is just part of the process, as the majority of them are linked to your account via what’s called DRM. Additionally, Amazon uses a proprietary format instead of ePub, which is more widely adopted by e-book readers. In other words, it’s like having your books locked in a box that is locked in another box.
Calibre is the master key that can help us with all of these locks. Additionally, it works as a library management software, keeping all the books in a folder on our computer. That’s just perfect for the Digital Caveman project, right?
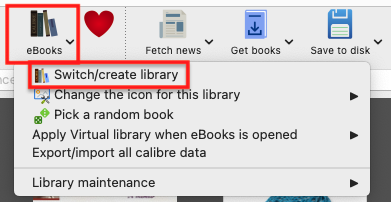
When you are first installing the app, it will suggest a folder for your library, but you can change it to what better suits you. In my case, I created a new Static Container (folder) called ‘eBooks’. And because the files in my Timeline System structure synchronize with multiple devices, my library is now widely available. But I’m getting ahead of myself.
As a tip, you can also move the library to a different folder in the future. Just click on the ‘eBooks’ button on the toolbar to choose a new location.
Next, we need to prepare Calibre to be able to remove the DRM from our books. This is done in two parts. First, we need to install and set up a plugin. It’s only after doing this that we’ll be able to tell Calibre to remove the DRM and convert the books to ePub.
Preparing Calibre
Add the serial number to the box and that’s it.
Converting to ePub
With all the above done, go to Calibre’s main window and click on the ‘Add books’ buttons. Select one or more books, and they will be added to your library’s folder.
Next, select one or more books in the list and click on the ‘Convert books’ option. You’ll see a new window with countless details that you can tweak on each book. There are even several formats available in addition to ePub, which is the pre-selected on. In my case, I kept everything as it was and clicked on the button to convert.
The Supernote
To understand how my books are being automatically sent to my Supernote, I suggest watching the video below.
But remember, the books are in my Obsidian Vault. And looking at how Calibre creates folders for each author, I’m already having insights about making those folders somehow connected to other content I have in Obsidian. Especially the ‘Knowledge Base’ notes, which share a strong relationship with the books I read. And that’s one of the reasons I chose to set the ‘eBooks’ folder as a Static Container.
The Digital Caveman Project
There are plenty of details I still would like to adjust, but all the digital content I create and own is now local first and free from walled gardens. In other words, 100% under my control.
In addition to my notes and website being created in Obsidian, my music, photos, now my books, every single file I use for my personal life and work, and even my passwords, are on my computer first. I even have my own ‘cloud’ system and a backup strategy.
🪨 I did it!
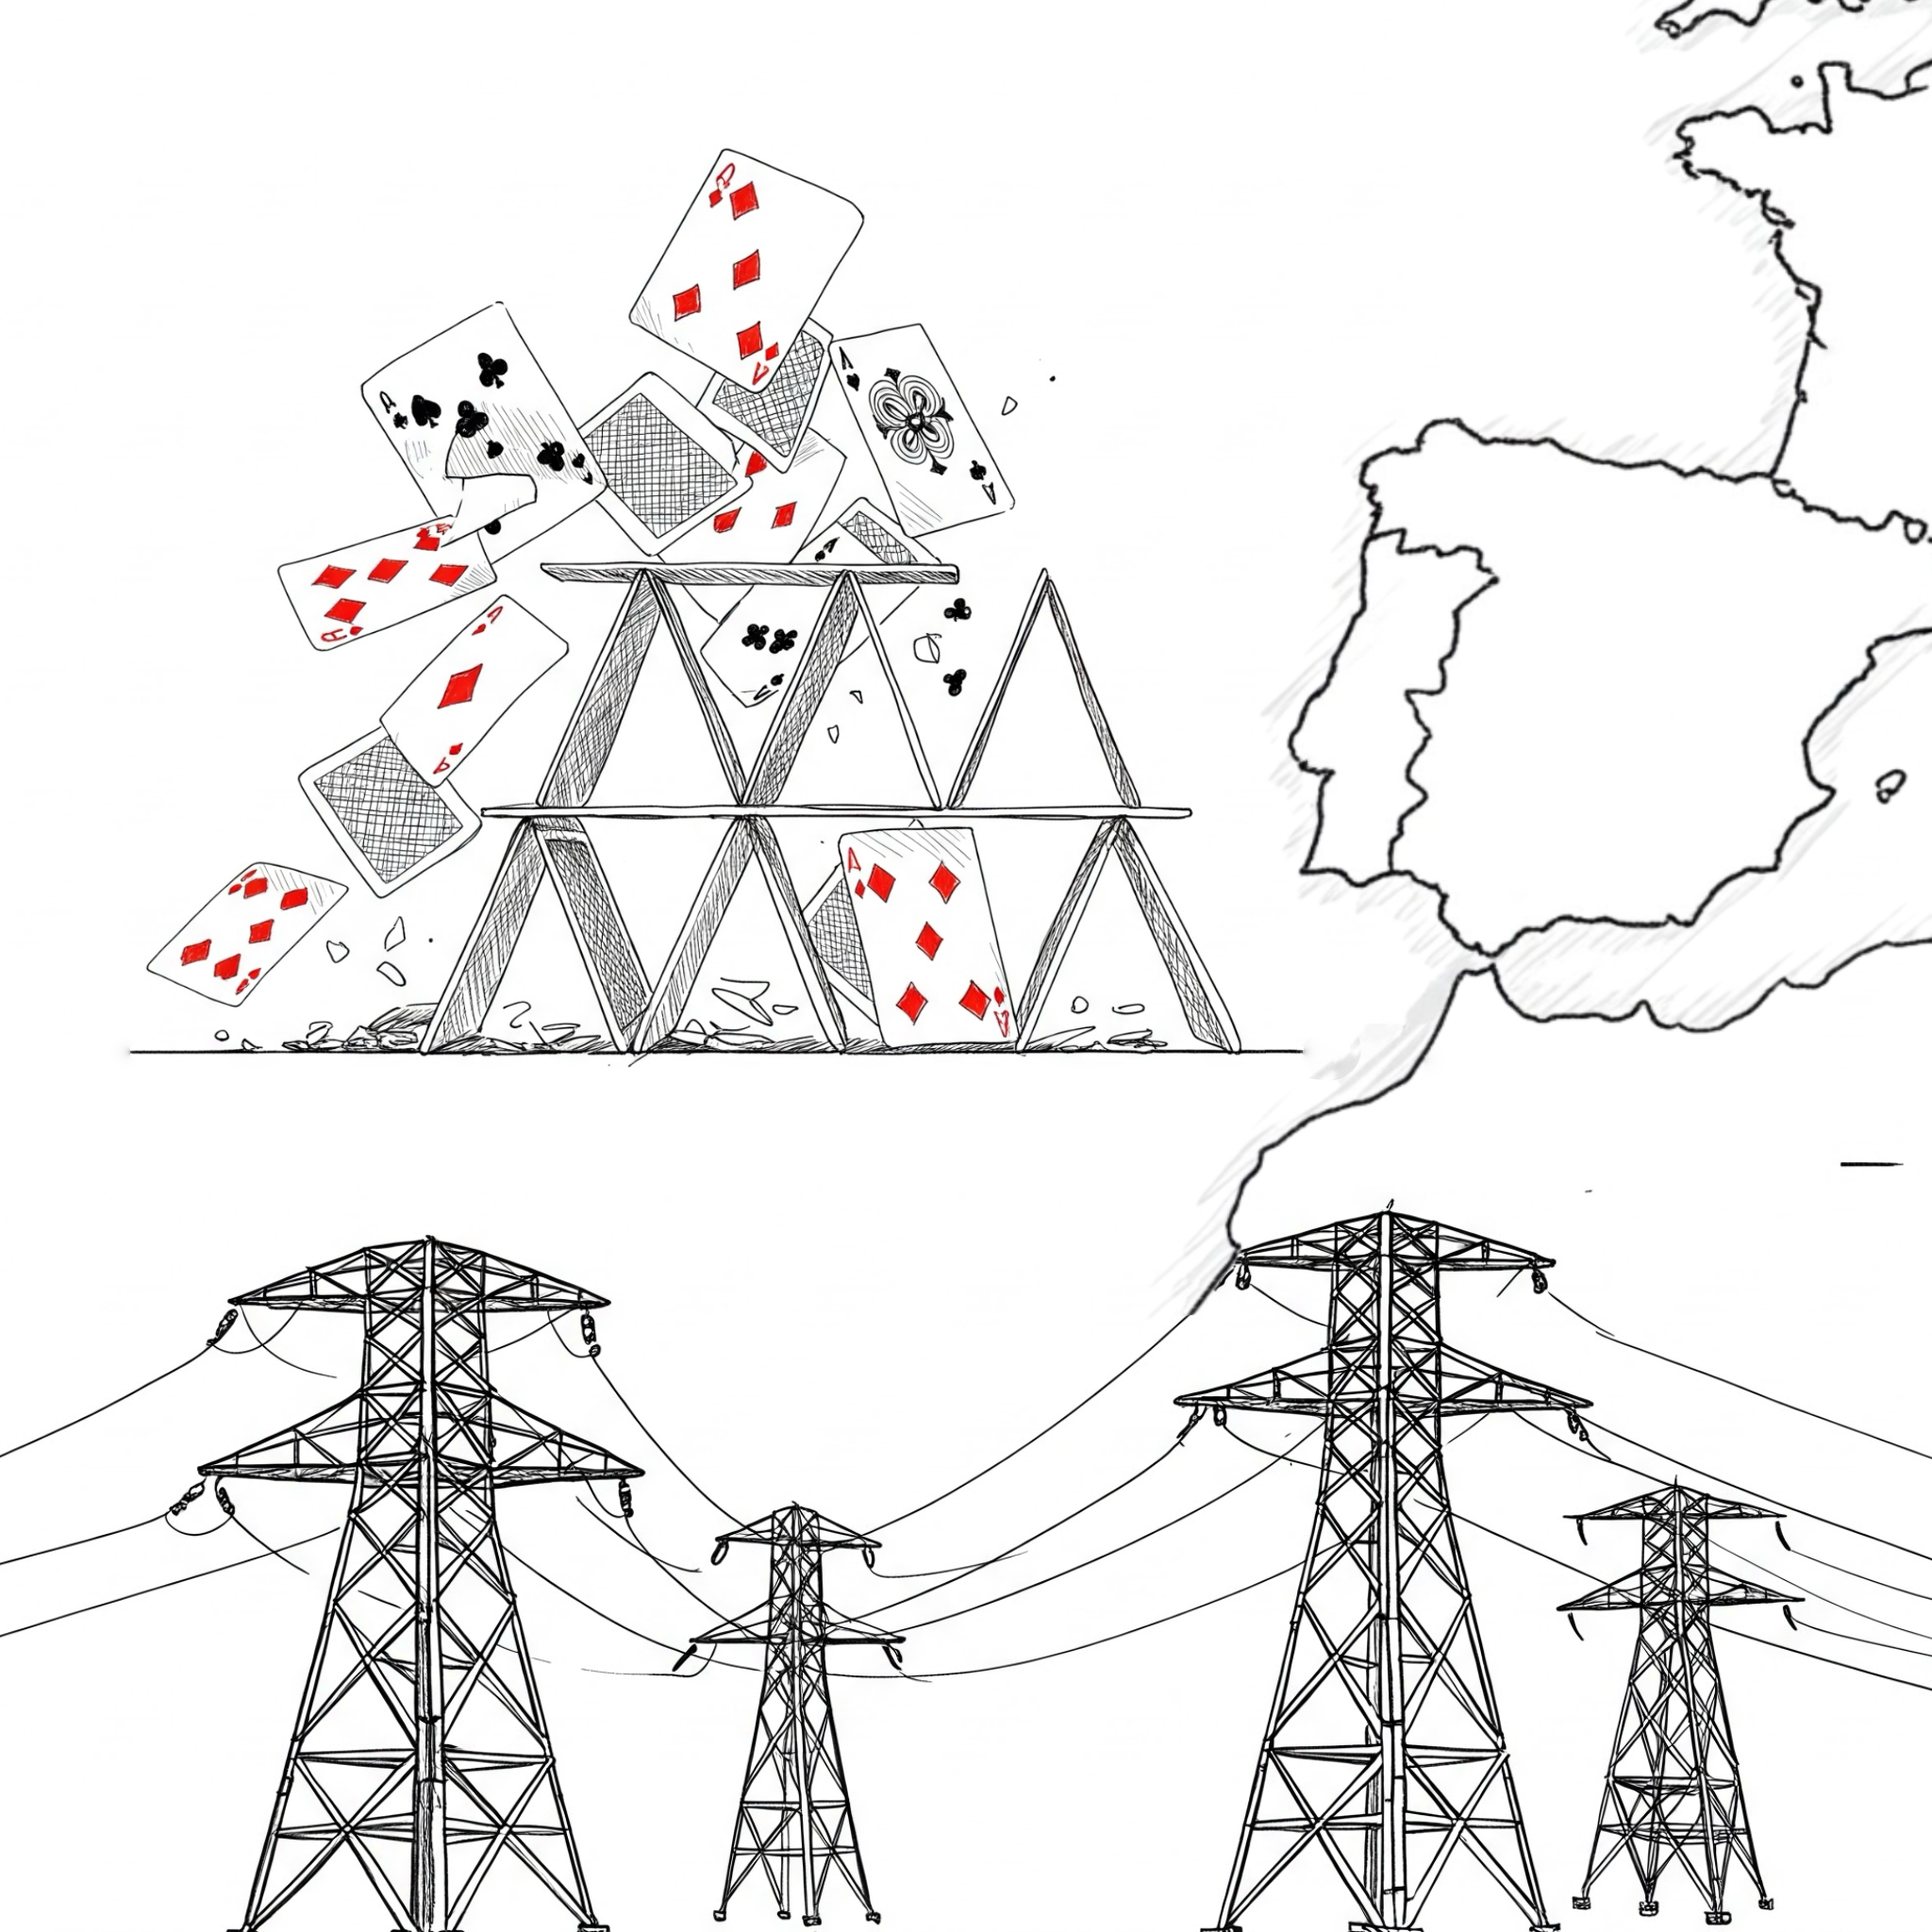
Our modern society is nothing but a delicate house of cards
If you don’t live in Portugal or Spain, it will be impossible for you to understand the feelings I’m trying to convey below. And I sincerely hope you never have to deal with it.
Around 11:30 a.m., the external monitor I have hooked to my laptop, went black while I was editing a video. If the room’s light hadn’t been also shut off, I would think it was a simple connection issue. This type of incident is such a rare phenomenon that at first I thought it was related to my apartment or building and decided to go for a walk with my dog.
Heading to the dog park, I grabbed my phone to share the “morning event” with my wife. Yes, we keep in touch all the time using Signal.
This was the moment I sensed something bigger was happening, but I still thought it was a local thing. My phone data connection was down, and as someone who has worked for 10 years in the telecommunications sector, I know that something like that rarely happens. There are so many contingencies and backups. Something else must be going on.
Maybe the entire neighborhood lost power, and, for some reason, the backup generator at the mobile phone tower closest to me didn’t kick off, I thought, trying to rationalize the situation.
I don’t know if it was instinct, but I immediately sent my wife an SMS: “I have no idea what’s happening, but we lost power and I have no data on my phone”. Again, because of many years of experience, I know how SMS works and how it is such a robust feature of the network. The SMS took longer than expected to be sent, and that was another undesired sign. Perhaps she didn’t get it.
My wife is currently on an overseas trip, so I text a friend here in Portugal: “We lost power and I have no data on my phone. What about you?” “We also lost power and I can barely use data. It looks like it’s affecting the entire country.” This is when I started having very unwanted thoughts. Instant communication is a crucial element that we take for granted. But if you think about it, modern society has been building on top of this core infrastructure since the invention of the telegraph.
Let me provide you with further context of the situation I found myself in at that moment. Every single appliance and equipment in my house is electric, so there’s no way to cook or take a hot shower. The TV cable is an Ethernet connector that plugs to an Internet hub, so there’s no way to watch the news. I also just sold my car, so no analog radio as well.
To make coffee that day, I used my gas-powered camping stove, which I ironically set up on top of its modern induction successor.

Okay, this is a national situation. A big one because the phones went down. If there’s a positive side to this, it’s that there are probably dozens of people working tirelessly to fix it. Again, little did I know.
Here’s when I decided I had to stay calm. I ate the rest of yesterday’s salad, grabbed my iPod, a book (the paper type), and thought to myself: If this is not solved until 4 p.m., I’ll go buy some extra supplies.
I read for two hours, but at some less engaging parts, I couldn’t help but stop and think about this unusual and unexpected situation. Looking around, I began to see all these wonderful sparks of beauty in the midst of the chaos. From my balcony, where I was reading, I could see all the other people on their balconies, kids playing on the street, and neighbors having fun conversations on their doorsteps.
I remember it now. This is how the world used to be when I was a kid, and even a teenager. This is how people used to behave before mobile phones existed.
Back to reality. “It’s 4 p.m. Time to buy some supplies,” I reminded myself.

I decided to bring my dog to a nice place we usually go together to relax, before heading to the supermarket. If there was one happy soul in the house, that was my dog. Ignorance is bliss.
Going to another dog park on the same day must be winning the dog’s lottery, right? It’s a somewhat hidden micro forest on the way to the supermarket. We stayed there, going back and forth from having fun to relaxing for a while. Then we headed to our main mission.
With no shopping carts available and so many people inside, the outcome couldn’t be different. The number of shelves empty was impressive. To give you some context, something like this never happened during COVID-19. Thankfully, I don’t need much, but that’s one more unwelcoming sign to add to my list, I thought to myself.
On the other hand, I kept seeing all these kids playing on the streets and so many adults in front of houses having conversations face to face and laughing without looking at their phones. Those scenes were absolutely beautiful.
As all of this was going on, I still didn’t have any mobile data and, shortly after texting my wife and my friend in the morning, the SMS system stopped working. If you haven’t guessed yet, there was no calling as well.
All the information I had, was collected here and there, talking to others on the street. But because most people didn’t have access to the rest of the world, it was impossible to know what was really happening. Moreover, all the ones I talked to would start the sentence with something like “I heard that…”
Experience, or perhaps hope, was telling me to keep sending journaling messages to my wife, and so I did. At this point, I was already back to using Signal, where I started narrating everything I was doing. That was the only app I kept opened all the time, hooping for momentarily breaths of the network.
If, for some reason, the network comes up for a few seconds or minutes, she’ll get all the updates. I didn’t know it at that moment, but she was doing the same on her side, and at about 7 p.m., a relieving exchange happened. I saw a burst of messages from her, and the read update pop-up on all the messages I had previously sent here. That would never happen again until the power and network came back to life at about 11 p.m. But at least she was now aware of what was happening to me.
I don’t know if this applies to everyone, but as I grew older, I started understanding that many things in life were never supposed to be about me. At some point, I learned that it’s about what I mean to other people, and that’s why I have to take care of myself. That’s for them! And it goes both ways, of course. Anything we do is always affecting the ones who love us, and this perception became so important to me that I’m constantly more worried about the feelings of the others, the loved ones. It’s like going to a funeral. Our main responsibility there is to comfort the ones that are still alive. We are there for them. Loving is seldom about us, and I wish I had learned this early in life.
Anyway, back to my ordeal. You know me, I’ve been detaching my digital life from the cloud for a long time. And I do have equipment to survive in a situation like this for a few days. Of course, I learned some new lessons with this test the world just tossed at me, and I’ll do my homework.
However, as a society, I think we are digging our own grave. Why are we increasingly relying on the cloud for everything? Why do all things have to have an app that has to be connected to the Internet to work? The more I think about it, the more I see unreliable digital conveniences replacing the so-called “outdated” gadgets that are still working so well. This is nothing more than building a gigantic house of cards. And to further add more salt to the injury, it is probably being built on top of a single point of failure.
This digital modern life of ours is so bizarre. Among all the real and relevant concerns I was having yesterday, it also occurred to me that I would lose my 775 streak on Duolingo if I couldn’t do my lesson today. Seriously?! The simple fact that something as futile as that crossed my mind is so absurd!
Today, I woke up feeling slightly stressed from my adventures and I still have a bit of a headache. Nothing terrible or distressing happened yesterday. Thankfully, I was working from home and everything was calm in my neighborhood. But, in retrospect, I think the real burden I felt was the thought of possibly not being able to connect with my loved ones living in different parts of the world. That, and the fact that nobody knew exactly what was happening or how many days would be like that. I didn’t miss anything else related to the Internet, just that connection with others and the real-time information that comes with instant communication.
By the way, I’m old enough to say that most of what we did at the beginning of the web was communicating via email, forums, blog comments, etc. It was a lot of fun!
I’m grateful to have power and communication back, but, when walking with my dog this morning, I saw people quickly resuming their lives just like if nothing had happened, and, in a way, that made me sad. Yesterday’s flourishes of harmony and beauty are now gone, like busted soap bubbles.
The insane society we are building for ourselves is now back on track, and the house of cards is sitting there waiting for the next breeze. Until then, the only sign of the now gone problems was a possible bug that kept the public lighting still on during this morning.
Inside my Obsidian Homepage-a portal to what matters most.
Do you have an Obsidian homepage? What’s on there? 🤔 Mine gives me instant access to tasks, trips, projects, and family info. It works as an efficient dashboard to what matters most.
First things first. My homepage is basically a note, automatically updated with dynamic information from other parts of Obsidian. In other words, it’s a dashboard created using the Homepage plugin, as demonstrated in the video below.
Since it is the first thing I see when I open Obsidian, I expect the information there to be what I’ll be looking for most of the time. And what could be more relevant than my next tasks?
Using the Tasks plugin and some basic configuration that you can learn in the video below, I created four dynamic lists: Overdue, Today, Tomorrow, and Upcoming. There’s also a fifth one that is mostly for groceries, but I also use it for anything I need to buy. That’s why it’s called Purshases.
Next is a world map widget with pins on every place I’ve been. It’s a backup of what I have on Google Maps and is built and automaticity updated using the Map plugin. There’s also a short list with links to the itinerary notes of my next trips. I could have this list dynamically built like the tasks, but I don’t travel that much and manually creating it is easier and, as you soon see, more useful.
The dashboard information is ordered by how often I need or use each module. That explains my tasks at the top, but why the trips section is right below it? Well, there are at least two parts to a trip: planing and the trip itself. In my case, there’s also a third part. I love to keep a journal during the trip, and when I return, I adjust the details here and there.
Planing and organizing a trip is more than a list of tasks. So, having the link to the itinerary note means that I can constantly go there to monitor what I have already done and what I still need to do. Then, during the trip, I can easily open the itinerary, and inside that note, find invaluable information, like a link to the hotel on Google Maps.
Since I see the Homepage every time I open Obsidian, there’s almost zero friction. It’s just a matter of scrolling a little bit to get to the links right below my tasks and click or tap.
When I come back, it’s time for some fine-tuning, and that’s when not having the next trips list automated is helpful. If links to past trips have not yet been removed, it means that I still have some work to do. By the way, this is a strategy I use all the time. Keeping things in an undesirable place is a constant reminder.
And it also works for physical objects too. For example, I recently kept a giant bicycle lock on top of my desk to remind me that I needed to make a copy of its key.
Back to the Homepage.
Next is a Canvas widget of my Knowledge Base. It used to be the only one, but below it, I now have another one with all the information related to my Apple IIe project. That project was dormant for more than a year, and it wouldn’t make sense to keep it on the Homepage. Now that I’m working on it again, having a direct link to all that information is very welcome. This demonstrates how dynamic the Homepage is.
And speaking about the Canvas, it has become my go-to feature for visually organizing all the information I have in my Static Containers. My Family Documents container is probably the next contender to be displayed like that. But for now, they are embedded notes on my Homepage.
It’s a long list that sits as the last segment because it is definitely something I frequently use, but it’s the least needed when compared to the other items.
Having a Homepage like this is a game-changer, but it has to meet your needs and reality. If you could see the ones I help my clients build, you would be impressed by how different they are.
Another important detail is that your notes have to be organized using a system that works for you. Of course, I use the Timeline System, but regardless of which one you choose, there must be some sort of predictability to have a good dashboard. Without that, your dashboard will only be adding more friction to your life.
Obsidian is great, but learning is inherently hard
If you are looking into switching to Obsidian, maybe my journey can help you.
The very first video about Obsidian was published on my YouTube channel on March 14, 2023. What some of you may not know is that I had been using it for longer than that to help clients here and there.
However, that amount of time is nothing when compared to the muscle memory I have developed from using Evernote for every little thing in my life for 16 years. The problem with the new is that it is always unwelcoming. It’s not only the different way of doing things; it’s also the constant uncertainty about doing anything. And at that point, Obsidian was not only new to me, but there’s also the sheer number of settings and plugins making it feel so overwhelming.
To make matters worse, I decided to bring my YouTube audience along with me on that new journey. For a long time, I have had the idea of creating a vlog-style productivity series on my channel that would show how I organize life and work. I thought that learning Obsidian would be a great opportunity to try that, but it ended up creating unnecessary confusion, as it is challenging to film myself figuring out things happening in real time.
Back to my point. After so many trials and errors, I’m now much more comfortable with how Obsidian works. Some of the setups I came up with, like the homepage demonstrated in the video below, are now running for a considerable amount of time and working so well. Furthermore, my Timeline System has matured to the point where it allows me to seamlessly navigate my daily activities.
Don’t tell anyone, but because of all of that, I feel like recording many of my past videos again. Anyway, you are not here for this. Let’s go through my tips for switching to a new app.
Before that, a disclaimer is needed, right? The following is how I did things. It’s also based on the strategy I use to help my clients, but it may not be suitable for you. So think of the suggestions below as just that, suggestions.
From Evernote to Obsidian
First, I didn’t abandon Evernote. I knew how things worked there, which mad it my safe haven during the transition period.
With that in mind, the first actual homework was to learn the basics about the mysterious Obsidian. Because of my clients, I had already done part of that before. But now I needed to move a step further and see how things would work in real life. To accomplish that, I created the first of many local vaults on my Mac to work as a sandbox.
Once that was done, I copied, I repeat, copied, not moved, parts of my notes. In some ways, Obsidian is so similar to Evernote, but in others, like how files are stored, it’s an entirely different approach. However, it works in such a way that you can have as many vaults as you wish and easily delete the ones that didn’t work. As long as you are coping your files, you can consider the multiple vaults to be a process of prototyping and iterating.
Like I mentioned at the beginning of the article, there’s a universe of settings and plugins. I suggest avowing all plugins as you are getting to know your way around. As for the settings, try to look for the answers as you need them. For example, when you feel like you have to learn how to format text, go look for tutorials on how to do that.
As you get used to it, move some more parts of your system, but I would still think of what you are doing on the new app as in experimental mode. It will take a while for you to get used to the numerous new things that are still making you uneasy.
If you followed my progress on YouTube, you know that I was constantly changing my setup and being frustrated by all the new ways of doing things. And let’s not forget that I was doing all the above while still using Evernote. So much so that at a certain point, I had a good portion of my activities being managed with the help of both apps, and that was driving me crazy.
To make things even more miserable, Evernote decided to redesign its mobile app. Now, on top of learning a new system, I had to adapt to a new way of doing things on the app I was so familiar with.
It was a lot, but it was worth it. It felt like a final partnership with my old friend, Evernote. The new design and new ways to do things helped me eventually find a way to implement the Timeline System that had been brewing in my head for so many years. Yes, the Timeline System I use in Obsidian and in the Supernote came to be because of my struggles with Evernote.
With that settled, the next step was to replicate the system in Obsidian and start moving all my files. But I did it one notebook at a time. I would export an Evernote notebook, import it to Obsidian, organize all the mess, and, just as a last resort, keep the exported notebook as a backup. In case you are wondering, yes, I still have them in a backup drive.
Plugins
But we are not done just yet. As I have already mentioned several times, Obsidian is full of settings and plugins. My strategy here is the same as at the beginning of this process. Whenever I need something that Obsidian cannot do, I start looking for a plugin.
I try to stick with the ones that do one of a few things, but every so often that’s not possible. For example, the Tasks plugin is too much for my needs, but I couldn’t find a lighter alternative that would work for me. Templater and all its features is one that I’m avoiding, as the Auto Template Trigger does almost everything I require. But when it comes to having fun, it looks like that rule doesn’t apply. I love using and tweaking every detail possible on the Map plugin.
Which brings us to one of the reasons I switched to Obsidian. Evernote has been on a downward trend of removing features since version 10 was released. I thought for a moment that Bending Spoons was going to bring old features back, but they kept removing them.
Guess what, many of the removed features I used to love in Evernote exist on Obsidian as a setting or are available as a plugin. And in most cases, these are better variations of what existed on Evernote. And that makes me so full of joy! It’s like being in a parallel universe, where Evernote evolved to what Obsidian is today. Back to reality, I’m definitely happy. So happy!
In summary, what I’m trying to say is first, have a safe haven. Second, take your time. Really, take your time. This will be a long project. Third, you already have a lot on your plate, don’t create more problems for yourself. Go look for settings and plugins only when you genuinely need to fulfill a specific requirement.